With the diversity of graphics applications, a single default selection style may not fit all application types. For example, selection requirements for a mechanical editing application may differ from an electrical editing application. With Visualize you can use the default pattern (classic) style or customize the selection style to meet individual application needs. For example, you can make selection more or less visible, change the coloring scheme, enable preferred highlighting details, render highlighting on top of scene geometry, etc.
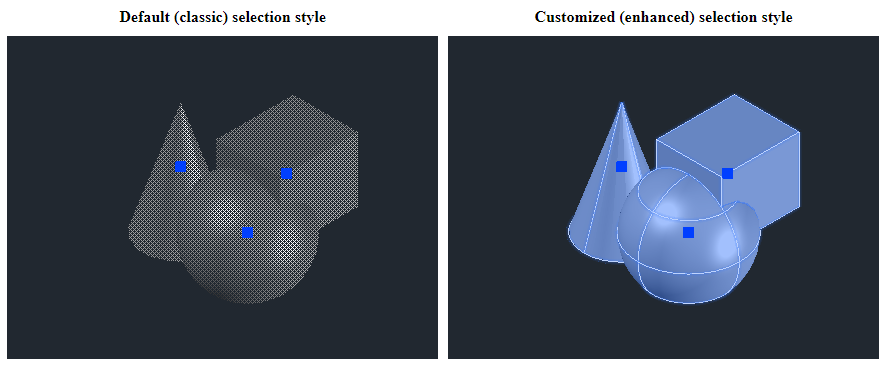
Additionally, you can simultaneously apply different selection styles for separate objects in a graphics scene. Multiple selection styles are useful for supporting multiple highlighting levels, for example, to select a set of objects and highlight the editable part of objects in the following illustration.
Selection style properties have more than 50,000 setup combinations for customizing the highlighting effect. The highlighting customization functionality applies to all types of ODA databases and doesn't depend on input file formats. This functionality is supported only by Open GLES2 and Metal vectorization modules.
Highlighting Customization Method
By default, for .dwg databases you can use the SELECTIONEFFECT system variable to switch between classic (pattern) and enhanced (color mask) selection styles. The SELECTIONEFFECTCOLOR system variable can be used to change the color of the enhanced selection style.
To completely control the selection style for an application, override the OdGiContext::selectionStyle method (which can be done in a similar way for any type of database):
OdUInt32 CDwgViewer::selectionStyle(OdUInt32 nStyle, OdGiSelectionStyle &selStyle) const
{
  if (nStyle > 2)
    OdGiDefaultContext::selectionStyle(0, selStyle);
  else if (nStyle > 0) // 250 115 48 | 115 250 48
  { OdCmEntityColor entColor((nStyle == 1) ? 250 : 115, (nStyle == 1) ? 115 : 250, 48);
    selStyle.setForColorMasking();
    for (OdUInt16 nBranch = 0; nBranch < 4; nBranch++)
    {
      OdGiSelectionStyle::StyleEntry &styleBranch = selStyle.styleFor(GETBIT(nBranch, 1), GETBIT(nBranch, 2));
      if (styleBranch.edgeStyle().isColorMaskingEnabled())
        styleBranch.edgeStyle().colorMask().setColor(entColor);
      if (styleBranch.faceStyle().isColorMaskingEnabled())
        styleBranch.faceStyle().colorMask().setColor(entColor);
    }
  }
  else
    OdGiContextForDbDatabase::selectionStyle(0, selStyle);
  return 4;
}
In this example, the OdGiContextForDbDatabase::selectionStyle method is overriden for a .dwg database context and uses four different selection styles:
- Selection style 0 — Selection style is chosen by OdGiContextForDbDatabase (enhanced or classic, depending on the SELECTIONEFFECT system variable setting).
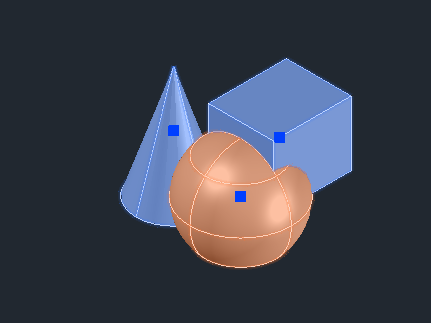
- Selection style 1 — Color masking selection style is similar to the enhanced selection style, but with the color red.
- Selection style 2 — Color masking selection style is similar to the enhanced selection style, but with the color green.
- Selection style 3 — Classic selection style, which is given by the OdGiDefaultContext::selectionStyle implementation.
Selection Style Structure
The selection style structure is described in the following illustration:
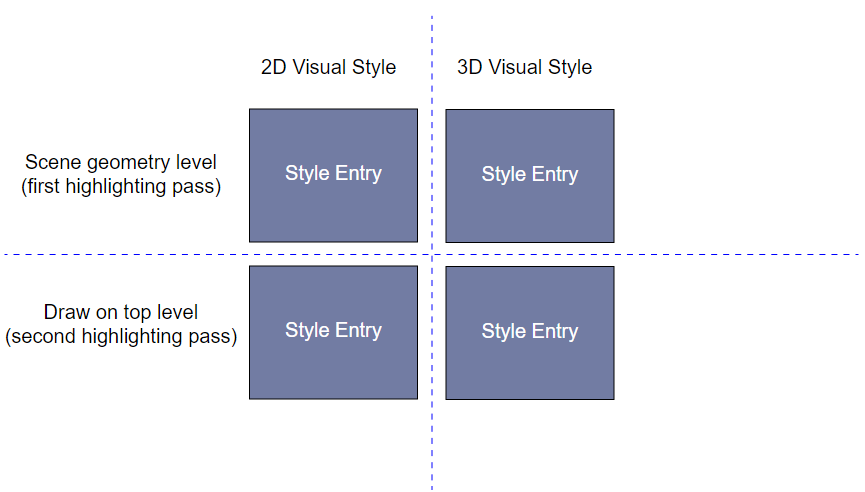
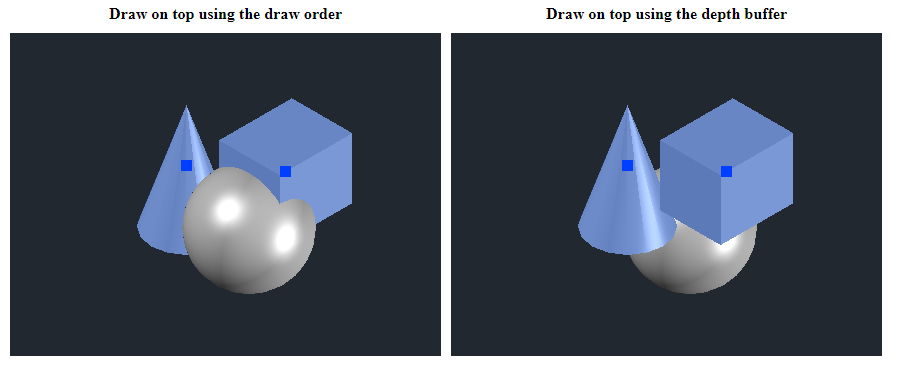
Internally, the highlighting style is represented by four style entries. You can specify different styles for two-dimensional and three-dimensional visual styles. Highlighting can be done in two passes: the first highlighting pass is done together with scene graphics rendering, and during the second pass the renderer draws the highlighting effect on top of other graphical scene objects.
Drawing the highlighting effect on top of scene geometry can be done in two modes:
- drawn on top using the draw order, which is actual for two-dimensional visual styles
- drawn on top of scene objects using the depth buffer, which is a better fit for three-dimensional visual styles
To enable the display of highlighting on top of the depth buffer, use the OdGiSelectionStyle::setOnTopOfDepth method.
Style entry structure:
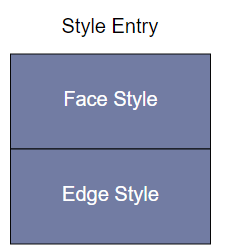
Each style entry is represented by separate face style and edge style configurations.
Face Style
You can control the following properties of the face style:
- Geometry visibility &mdash To enable or disable geometry visibility, use the OdGiSelectionStyle::ElementStyle::setVisible method.
- Pattern effect &mdash To enable or disable a highlighting pattern, use the OdGiSelectionStyle::ElementStyle::enablePattern method.
- Color masking &mdash To enable or disable a color masking effect, use the OdGiSelectionStyle::ElementStyle::enableColorMasking method. The color and transparency level of a color mask can be changed by the OdGiSelectionStyle::ColorMask class method. The current style's OdGiSelectionStyle::ColorMask class is returned by the OdGiSelectionStyle::ElementStyle::colorMask method.
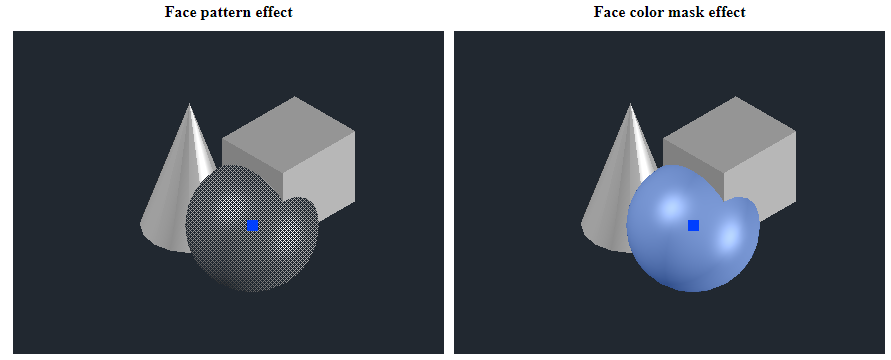
Pattern and color mask effects can be enabled together.
Edge Style
You can control the following properties of the edge style:
- Geometry visibility &mdash To enable or disable geometry visibility, use the OdGiSelectionStyle::ElementStyle::setVisible method.
- Pattern effect &mdash To enable or disable a highlighting pattern, use the OdGiSelectionStyle::ElementStyle::enablePattern method.
- Color masking &mdash To enable or disable a color masking effect, use the OdGiSelectionStyle::ElementStyle::enableColorMasking method. The color and transparency level of a color mask can be changed by the OdGiSelectionStyle::ColorMask class method. The current style's OdGiSelectionStyle::ColorMask class is returned by the OdGiSelectionStyle::ElementStyle::colorMask method.
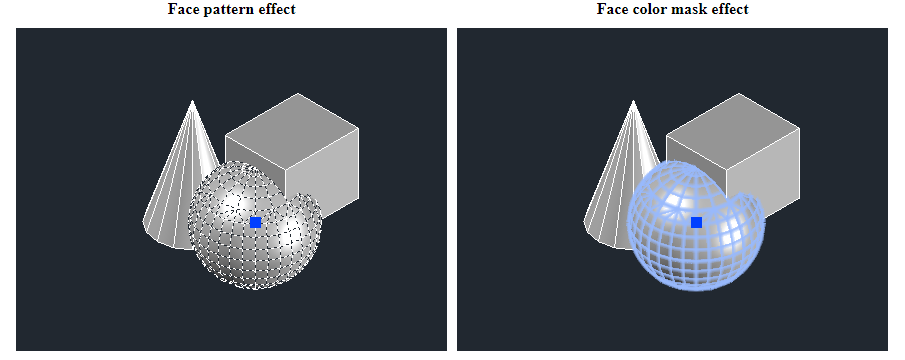
Pattern and color mask effects can be enabled together.
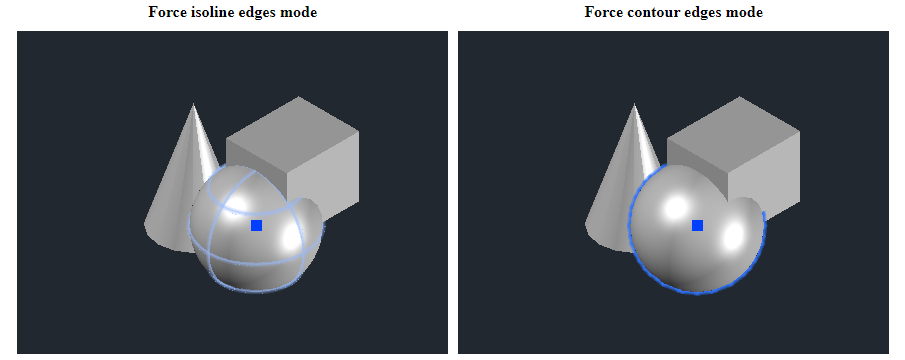
- Edges mode &mdash There are three edge modes: draw existing edges, force isoline rendering, and force silhouette rendering. These modes can be changed using the OdGiSelectionStyle::EdgeStyle::setMode method.
- Line width extension &mdash This property is specified in pixels and can be set using the OdGiSelectionStyle::EdgeStyle::setLineWeightExtension method. By default, the renderer applies an anti-aliasing effect to the width of an extended line, which creates a smooth gradient at the edge corners (this effect is also called a "glow" effect). The level of smoothing can be controlled with the AntiAliasHltLevelExt property (for more information, see ODA Vectorization Devices Properties). Setting it to 0.0 disables the anti-aliasing effect.
Example of Using Multiple Selection Styles
You can use multiple selection styles for any kind of database by using OdGsBaseModelReactor. The following example shows how to use multiple selection styles for a .dwg database.
First, implement a new class inherited from OdGsBaseModelReactor and override the OdGsBaseModelReactor::onHighlight method:
struct MultipleSelectionStyles : public OdGsBaseModelReactor
{
  OdUInt32 m_nSelStyle;
  MultipleSelectionStyles() : m_nSelStyle(0) { }
  virtual bool onHighlight(OdGsModel * /*pModel*/, const OdGiPathNode & /*path*/, bool /*bDoIt*/, OdUInt32 &nStyle, const OdGsView * /*pView*/)
  { nStyle = m_nSelStyle; return true; }
  virtual bool onHighlight(OdGsModel * /*pModel*/, const OdGiPathNode & /*path*/, const OdGsMarker * /*pMarkers*/, OdUInt32 /*nMarkers*/, bool /*bDoIt*/, OdUInt32 &nStyle, const OdGsView * /*pView*/)
  { nStyle = m_nSelStyle; return true; }
} mSelStyles;
For simplicity, combine the reactor together with a selection style context override (from the Highlighting Customization Method section of this topic) in one class:
struct Ctx : public OdStaticRxObject<OdGiContextForDbDatabase>, public OdGsBaseModelReactor
{
  OdUInt32 m_nSelStyle;
  Ctx() : m_nSelStyle(0) { }
  virtual OdUInt32 selectionStyle(OdUInt32 nStyle, OdGiSelectionStyle &selStyle) const
  {
    if (nStyle > 2)
      OdGiDefaultContext::selectionStyle(0, selStyle);
    else if (nStyle > 0) // 250 115 48 | 115 250 48
    { OdCmEntityColor entColor((nStyle == 1) ? 250 : 115, (nStyle == 1) ? 115 : 250, 48);
      selStyle.setForColorMasking();
      for (OdUInt16 nBranch = 0; nBranch < 4; nBranch++)
      {
        OdGiSelectionStyle::StyleEntry &styleBranch = selStyle.styleFor(GETBIT(nBranch, 1), GETBIT(nBranch, 2));
        if (styleBranch.edgeStyle().isColorMaskingEnabled())
          styleBranch.edgeStyle().colorMask().setColor(entColor);
        if (styleBranch.faceStyle().isColorMaskingEnabled())
          styleBranch.faceStyle().colorMask().setColor(entColor);
      }
    }
    else
      OdGiContextForDbDatabase::selectionStyle(0, selStyle);
    return 4;
  }
  virtual bool onHighlight(OdGsModel * /*pModel*/, const OdGiPathNode & /*path*/, bool /*bDoIt*/, OdUInt32 &nStyle, const OdGsView * /*pView*/)
  { nStyle = m_nSelStyle; return true; }
  virtual bool onHighlight(OdGsModel * /*pModel*/, const OdGiPathNode & /*path*/, const OdGsMarker * /*pMarkers*/, OdUInt32 /*nMarkers*/, bool /*bDoIt*/, OdUInt32 &nStyle, const OdGsView * /*pView*/)
  { nStyle = m_nSelStyle; return true; }
} _ctx;
Connect the reactor implementation to the database graphics cache model:
OdGsLayoutHelper::cast(pGsDevuce)->gsModel()->addModelReactor(&_ctx);
Next, simply change the selection style number inside the reactor implementation when you need to highlight something inside the graphics scene:
{ _ctx.m_nSelStyle = 2; // Change selection style.
  // Select entities inside graphics scene and highlight selected.
  OdDbSelectionSetPtr pSSet = OdDbSelectionSet::select(pDb->activeViewportId(), 2, pSelPoints);
  OdDbSelectionSetIteratorPtr pIt = pSSet->newIterator();
  while (!pIt->done())
  {
    OdDbEntityPtr pEnt = pIt->objectId().safeOpenObject();
    pEnt->highlight(true);
    pIt->next();
  }
}
For each highlighting operation of an entity, the reactor's OdGsBaseModelReactor::onHighlight method overrides are called and simply substitute the default selection style with a custom selection style value.
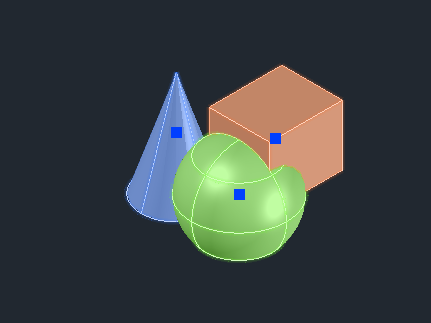
The result of highlighting with different selection styles: