A DatumTarget can be used to control the tolerance of an entire surface, as the datum establishes a theoretically precise plane, line, or profile.
Create a DatumTarget and set the default properties using your current database(pDb):
AcmDatumTargetPtr pDatumTgt = AcmDatumTarget::createObject();
pDatumTgt->setSymbolDefaults(pDb);
Set the display data and position for the balloon target:
AcmCTargetBalloon* pBalloonTgt = pDatumTgt->balloon();
OdGePoint3d leaderPoint1(50.0, 310.0, 0.0);
OdGePoint3d leaderPoint2(105.0, 350.0, 0.0);

pBalloonTgt->setValue(Acm::DatumTargetSize, L"1");
pBalloonTgt->setValue(Acm::DatumTargetText, L"A");
pBalloonTgt->setOrigin(leaderPoint2);

OdCmColor dataColor;
dataColor.setColorIndex(6);
Set text properties:
AcmDatumStdPtr pStd = pDatumTgt->serverId().safeOpenObject(OdDb::kForWrite);
pStd->setTextColorByStandard(false);
pStd->setTextTrueColor(dataColor);
pStd->setPointTrueColor(dataColor);
pStd->setTextHeightByStandard(false);
pStd->setTextHeight(5.0);
et the DatumTarget to the far side:
pDatumTgt->setHidden(true);
Append leader points to the points array and create a leader:
OdGePoint3dArray leaderPoints;
leaderPoints.append(leaderPoint1);
leaderPoints.append(leaderPoint2);
pDatumTgt->addLeader(leaderPoints);
Set the origin for the DatumTarget:
pDatumTgt->setOrigin(leaderPoint2);
Attach reference geometry:
AcRfGeomPtr rfGeom;
createAcRfGeomByGeomObject(pDb, compGeomObjectId, rfGeom);
pDatumTgt->attachGeomRef((void*)rfGeom, leaderPoint1);
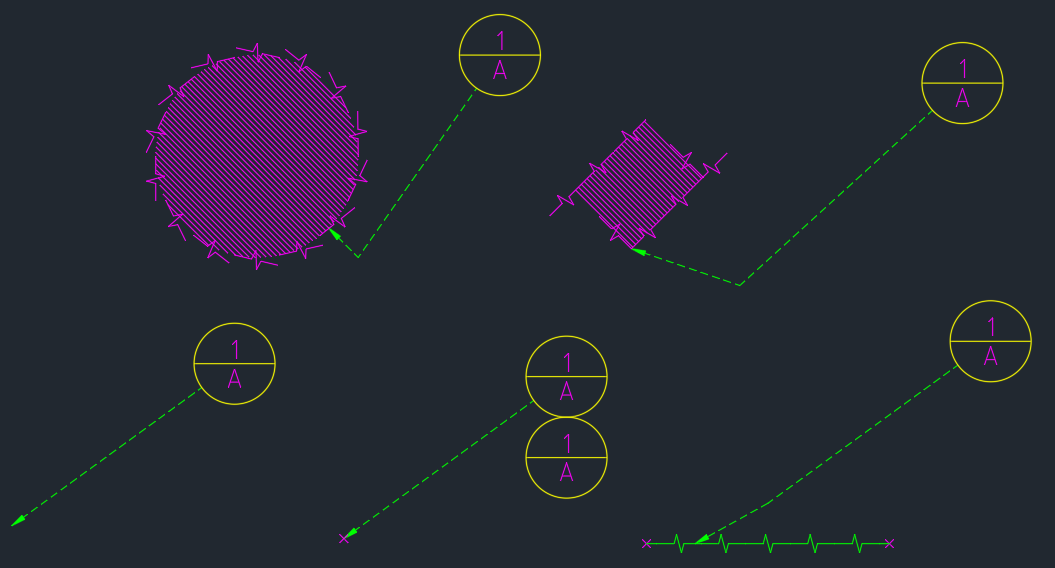
If you want to create a point target, use the following code to make a new target and set the cross size visibility and size:
AcmCTargetPoint* pPointTgt = static_cast < AcmCTargetPoint* >(pDatumTgt->getNewTarget(Acm::kPoint));
pPointTgt->setDrawPoint(true);
pPointTgt->setOrigin(leaderPoint1);
pStd->setPointSize(6.0);
To create a line target and set the point size, factor, and line parameters:
AcmCTargetLine* pLineTgt = static_cast < AcmCTargetLine* >(pDatumTgt->getNewTarget(Acm::kLine));
pStd->setPointSize(1.0);
OdGePoint3d start, end;
start = end = leaderPoint1;
start.x -= 30.0;
end.x += 30.0;
start.y = end.y = leaderPoint1.y - 10.0;
pLineTgt->setOrigin(start);
pLineTgt->setEndPoint(end);
pLineTgt->setFactor(0.2);
You can customize the linetype of your line target:
OdDbLinetypeTablePtr pTable = pDb->getLinetypeTableId().safeOpenObject();
OdString lineTypeName("Amzigzag");
OdDbObjectId lineTypeId = pTable->getAt(lineTypeName);
pStd->setBorderLineId(lineTypeId);
To create a circular target and set the radius and position:
AcmCTargetCircularArea* pCircTgt = static_cast < AcmCTargetCircularArea* >(pDatumTgt->getNewTarget(Acm::kCircular));
pCircTgt->setRadius(25.0);
pCircTgt->setOrigin(leaderPoint1 + OdGeVector3d(-25.0, 25.0, 0.0));
Set hatch properties for a circular target:
pStd->setHatchDist(10.0);
pStd->setHatchAngle(OdaPI2);
To create a rectangular target:
AcmCTargetRectangularArea* pRectTgt = static_cast < AcmCTargetRectangularArea* >(pDatumTgt->getNewTarget(Acm::kRectangular));
pRectTgt->setOrigin(leaderPoint1 + OdGeVector3d(-25.0, 25.0, 0.0));
The first method to initialize a rectangular target:
pRectTgt->setCornerPoint(leaderPoint1 + OdGeVector3d(-10.0, 10.0, 0.0));
pRectTgt->setAnglePoint(leaderPoint1 + OdGeVector3d(1.0, 1.3, 0.0));
The second method to initialize a rectangular target:
pRectTgt->setXSize(25.0);
pRectTgt->setYSize(20.0);
pRectTgt->setAngle(OdaPI4);
Add your entity to model space:
OdDbBlockTableRecordPtr pBTR = btrId.safeOpenObject(OdDb::kForWrite);
pBTR->appendOdDbEntity(pDatumTgt);
The last step is to set the layer for the DatumTarget:
pDatumTgt->setLayer(L"AM_5");

