Visualize SDK allows you to implement animation for entities, sub-entities and cameras. The Animation API has three possible transformations: translation, rotation and scaling.
Create an Animation
Animation Container
The first step in animation creation is the creation of an animation container. An animation container contains <Actor, Action> pairs and binds them to the timeline, where Actor defines the object to be animated and Action defines modification rules. An animation container in Visualize SDK is represented by an OdTvAnimationContainer object. It can be created using the corresponding OdTvDatabase method:
OdTvAnimationContainerId contId = pDb->createAnimationContainer( OD_T( "LineAnimation" ) );
OdTvAnimationContainerPtr pCont = contId.openObject( OdTv::kForWrite );
Actor
An actor defines the object that is modified during the animation process. In Visualize SDK an actor is represented by the OdTvSubItemPath class which can refer to an entity, sub-entity or camera object.
Action
An action defines the modification rules and is the most complicated phase of animation development. Since an animation container binds actions to the timeline, the action uses frame representation for the modification rules. An action contains frames. Some of these frames are keyframes that you need to specify. Other frames are interpolated using keyframes and the specified interpolation method. An action in Visualize SDK is represented by the OdTvAnimationAction object. It can be created using the corresponding OdTvDatabase method:
OdTvAnimationActionId actionId = pDb->createAnimationAction( OD_T( "LineRotation" ) );
OdTvAnimationActionPtr pAction = actionId.openObject( OdTv::kForWrite );
After an action is created, it should be configured. For example, the number of frames can be specified:
pAction->setNumFrames( 361 );
Also, frames per second can be specified to define the action speed. After configuration is complete, you need to specify action keyframes using the following OdTvAnimationAction method:
virtual OdTvResult setKeypoint( OdUInt32 nFrame, Keydata kd, double keyval, Interpolator ipl = kCubic ) = 0;
- nFrame — frame number
- kd — object data to be changed
- keyval — actual object data value at this frame
- ipl — interpolation mechanism to be used between keyframes
For example, the following code creates an action that contains 361 frames and rotates an object around the z-axis by 360 degrees (each 10th frame is a keyframe):
OdTvAnimationActionId actionId = pDb->createAnimationAction( OD_T( "LineRotation" ) );
OdTvAnimationActionPtr pAction = actionId.openObject( OdTv::kForWrite );
pAction->setNumFrames( 361 );
for( OdUInt32 i = 0; i <= 360; i+=10 )
{
  double angle = (double)(i)*OdaPI / 180.0;
  pAction->setKeypoint( i, OdTvAnimationAction::kRotationZ, angle, OdTvAnimationAction::kLinear );
}
A keyframe can modify more than one Keydata channel, for example:
pAction->setKeypoint( 25, OdTvAnimationAction::kTranslationX, 10, OdTvAnimationAction::kLinear );
pAction->setKeypoint( 25, OdTvAnimationAction::kTranslationY, -10, OdTvAnimationAction::kLinear );
In this sample, the keyframe moves an object about both the x- and y-axes.
Keydata
An animation action supports three possible transformations: translation, rotation and scaling. Each of them is presented as three channels in the OdTvAnimationAction::Keydata enumeration:
enum Keydata
{
  kTranslationX,  //Translation by the x-axis.
  kTranslationY,  //Translation by the y-axis.
  kTranslationZ,  //Translation by the z-axis.
  kRotationX,     //Rotation by the x-axis.
  kRotationY,     //Rotation by the y-axis.
  kRotationZ,     //Rotation by the z-axis.
  kScaleX,        //Scaling by the x-axis.
  kScaleY,        //Scaling by the y-axis.
  kScaleZ,        //Scaling by the z-axis.

  kNumKeydata     //Service type: number of actual data types.
};
Interpolation
Frames in the interval [Keyframe1;Keyframe2] can be interpolated in three ways:
- Threshold interpolation: value = Keyframe1 value on interval [Keyframe1; Keyframe2) and value = Keyframe2 value at frame Keyframe2
- Linear interpolation
- Cubic spline interpolation
The type of interpolation is described by the OdTvAnimationAction::Interpolator enumeration:
enum Interpolator
{
  kThreshold,     //No interpolation: value is equal to the previous keypoint value.
  kLinear,        //Linear interpolation.
  kCubic          //Cubic spline interpolation.
};
Combine Action and Actor
After the action and actor are specified, they can be added to an animation container using the following OdTvAnimationContainer method:
virtual OdTvResult addAnimation( const OdTvSubItemPath& actor, const OdTvAnimationActionId& actionId, OdInt32 nRepeats = 0, OdUInt32 timeStart = 0, OdTvActorBasis* pCustomBasis = NULL ) = 0;
};
- nRepeats — the number of animation repeats (0 – no repeats, play animation only once; 1 – play and repeat once; -1 – infinite repeat)
- timeStart — animation start time in milliseconds
- pCustomBasis — a pointer to the custom actor basis
The same animation action can be used with different actors in the same or different animation containers (you do not need to create a "360-degree rotation" action for each actor). Also, the same actor can be used with different actions in the same or different animation containers.
Custom Actor Basis
Let's suppose there is an actor and an animation action that rotates the actor by 360 degrees around the x-axis:
OdTvAnimationActionPtr pAction = actionId.openObject( OdTv::kForWrite );
pAction->setNumFrames( 360 );
pAction->setKeypoint( 0, OdTvAnimationAction::kRotationX, 0.0, OdTvAnimationAction::kLinear );
pAction->setKeypoint( 359, OdTvAnimationAction::kRotationX, 359.0 * OdaPI / 180.0, OdTvAnimationAction::kLinear );
For example, you want to rotate the actor around a different vector such as OdTvVector( 1.0, 1.0, 1.0 ). You can use the action from the code above and specify a custom actor basis:
OdTvAnimationContainer::OdTvActorBasis* pBasis = new OdTvAnimationContainer::OdTvActorBasis();
pBasis->origin() = actorExtents.center();
pBasis->xAxis() = OdTvVector( 1.0, 1.0, 1.0 );
pAction->addAnimation( actor, actionId, -1, 0, pBasis );
In this sample, the actor extents center acts as the origin — this is the default origin for entity animation. OdTvActorBasis has no limitation, so a different axis can be colinear and non-normalized.
Play an Animation
An animation container also should be used to play an animation using the following method:
virtual OdTvResult setCurrentTime( OdUInt32 msec )
This method specifies the current time for the container, so it converts the time to the appropriate frame number for each <Actor, Action> pair that contains and executes actions by the actors. For example, the following code for Microsoft® Windows® operating systems uses the current time as 0 for the animation container; next it uses the difference between the saved current time and the result of the clock() method to animate objects:
clock_t start = clock();
clock_t curTime = start;
OdUInt32 nTotalTime = 0;
Bool bInfinite = !pCont->totalTime( nTotalTime );
while( curTime - start < nTotalTime || bInfinite )
{
  pCont->setCurrentTime( curTime – start );
  pDevice->update();
  curTime = clock();
}
Validate an Animation
When an <Actor, Action> pair is added to the animation container, some caches are calculated. However, after this actor is modified (e.g., moved), the calculated cache becomes invalid. Note that an animation container does not follow the changes of the actor or the action, so caches have to be validated manually by calling the following method:
virtual OdTvResult validateAnimations() = 0;
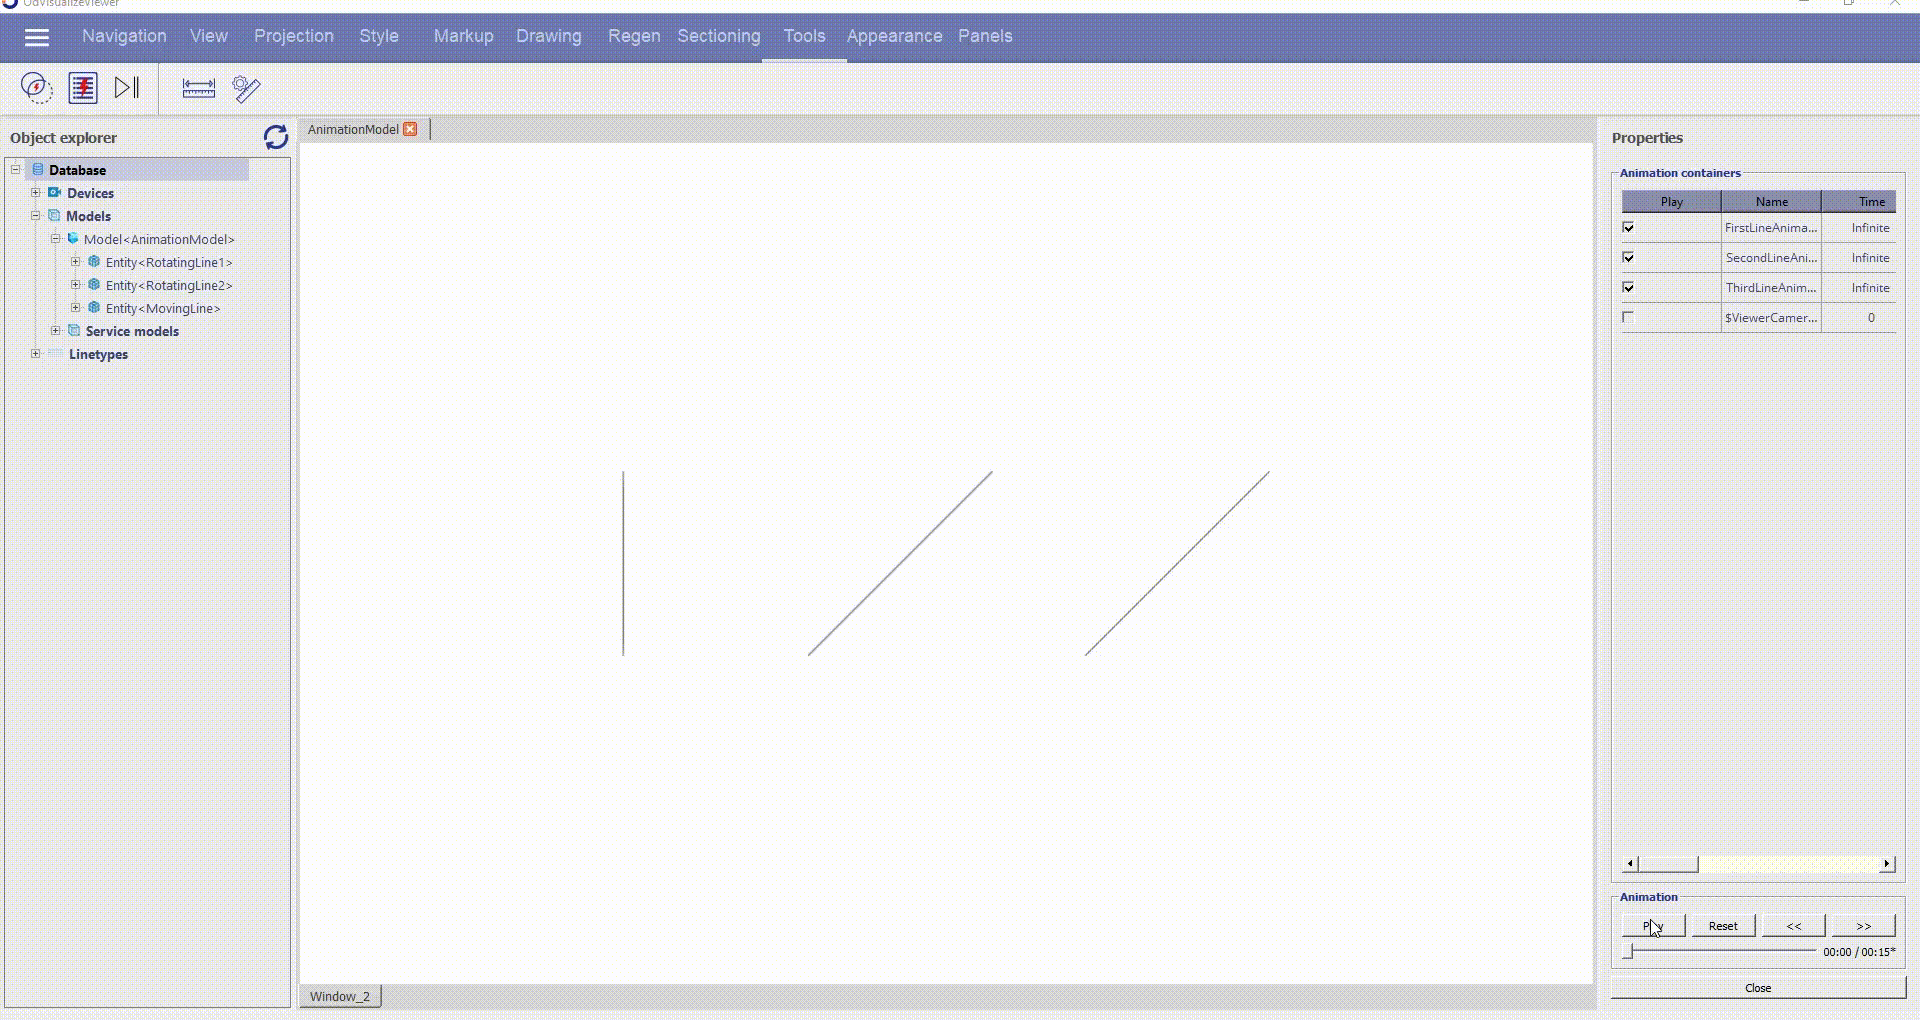
Animation Example
The following example code generates a VSF file with a model that contains three lines. This file also contains an endless animation for these lines: two of them are rotated on their center points around the z-axis and one line moves in a repeated "figure 8" pattern. This example can be launched in the OdVisualizeViewer application from Examples > Animation > EntityAnimation.
//1. Initial step
//1.1 Create database and model
OdTvDatabaseId dbId;
OdTvFactoryId factId = odTvGetFactory();
dbId = factId.createDatabase();
OdTvDatabasePtr pDb = dbId.openObject( OdTv::kForWrite );
OdTvModelId modelId = pDb->createModel( OD_T( "SimpleModel" ) );
OdTvModelPtr pModel = modelId.openObject( OdTv::kForWrite );
//1.2 Create entity with single line
OdTvEntityId entId = pModel->appendEntity();
OdTvEntityPtr pEnt = entId.openObject( OdTv::kForWrite );
pEnt->appendPolyline( OdTvPoint( -1.0, -1.0, 0.0 ), OdTvPoint( 1.0, 1.0, 0.0 ) );
//2. Create animation
//2.1 Create animation container
OdTvAnimationContainerId contId = pDb->createAnimationContainer( OD_T( "LineAnimation" ) );
OdTvAnimationContainerPtr pCont = contId.openObject( OdTv::kForWrite );
//2.2 Create animation action: rotation on 360 degrees around Z axis
//2.2.1 Create action
OdTvAnimationActionId actionId = pDb->createAnimationAction( OD_T( "LineRotation" ) );
OdTvAnimationActionPtr pAction = actionId.openObject( OdTv::kForWrite );
//2.2.2 Specify number of frames
pAction->setNumFrames( 361 );
//2.2.3 Each 10 frame is a key frame
for( OdUInt32 i = 0; i <= 360; i+=10 )
{
  double angle = (double)(i)*OdaPI / 180.0;
  pAction->setKeypoint( i, OdTvAnimationAction::kRotationZ, angle, OdTvAnimationAction::kLinear );
}
//2.3 Specify actor
OdTvSubItemPath actor;
actor.entitiesIds().push_back( entId );
//2.4 Add pair <Actor, Action> to the container with infinite repeats number
pCont->addAnimation( actor, actionId, -1 );

//Another animation with the same action
entId = pModel->appendEntity( OD_T( "RotatingLine2" ) );
pEnt = entId.openObject( OdTv::kForWrite );
pEnt->appendPolyline( OdTvPoint( -1.0, -1.0, 0.0 ), OdTvPoint( 1.0, 1.0, 0.0 ) );
pEnt->setModelingMatrix( OdTvMatrix::translation( OdTvVector( 3.0, 0.0, 0.0 ) ) );
contId = pDb->createAnimationContainer( OD_T( "SecondLineAnimation" ) );
pCont = contId.openObject( OdTv::kForWrite );
OdTvSubItemPath actor1;
actor1.entitiesIds().push_back( entId );
pCont->addAnimation( actor1, actionId, -1 );

//Third animation - translation
entId = pModel->appendEntity( OD_T( "MovingLine" ) );
pEnt = entId.openObject( OdTv::kForWrite );
pEnt->appendPolyline( OdTvPoint( -3.0, 1.0, 0.0 ), OdTvPoint( -3.0, -1.0, 0.0 ) );
contId = pDb->createAnimationContainer( OD_T( "ThirdLineAnimation" ) );
pCont = contId.openObject( OdTv::kForWrite );
OdTvSubItemPath actor2;
actor2.entitiesIds().push_back( entId );
actionId = pDb->createAnimationAction( OD_T( "LineTranslation" ) );
pAction = actionId.openObject( OdTv::kForWrite );
pAction->setNumFrames( 41 );
pAction->setKeypoint( 0, OdTvAnimationAction::kTranslationX, 0.0, OdTvAnimationAction::kLinear );
pAction->setKeypoint( 0, OdTvAnimationAction::kTranslationY, 0.0, OdTvAnimationAction::kLinear );

pAction->setKeypoint( 10, OdTvAnimationAction::kTranslationX, -1.0, OdTvAnimationAction::kLinear );
pAction->setKeypoint( 10, OdTvAnimationAction::kTranslationY, -1.0, OdTvAnimationAction::kLinear );

pAction->setKeypoint( 20, OdTvAnimationAction::kTranslationX, -1.0, OdTvAnimationAction::kLinear );
pAction->setKeypoint( 20, OdTvAnimationAction::kTranslationY, 0.0, OdTvAnimationAction::kLinear );

pAction->setKeypoint( 30, OdTvAnimationAction::kTranslationX, 0.0, OdTvAnimationAction::kLinear );
pAction->setKeypoint( 30, OdTvAnimationAction::kTranslationY, -1.0, OdTvAnimationAction::kLinear );

pAction->setKeypoint( 40, OdTvAnimationAction::kTranslationX, 0.0, OdTvAnimationAction::kLinear );
pAction->setKeypoint( 40, OdTvAnimationAction::kTranslationY, 0.0, OdTvAnimationAction::kLinear );

pCont->addAnimation( actor2, actionId, -1 );

//3 Create device and view, save file
{
  OdTvGsDeviceId devId = pDb->createDevice( OD_T( "SimpleDevice)" ) );
  OdTvGsDevicePtr pDev = devId.openObject( OdTv::kForWrite );
  OdTvGsViewId viewId = pDev->createView( OD_T( "SimpleView)" ) );
  OdTvGsViewPtr pView = viewId.openObject( OdTv::kForWrite );
  pView->addModel( modelId );
  pDev->addView( viewId );
  pDb->writeFile( OD_T( "D:\\LineAnimation.vsf" ) );
}
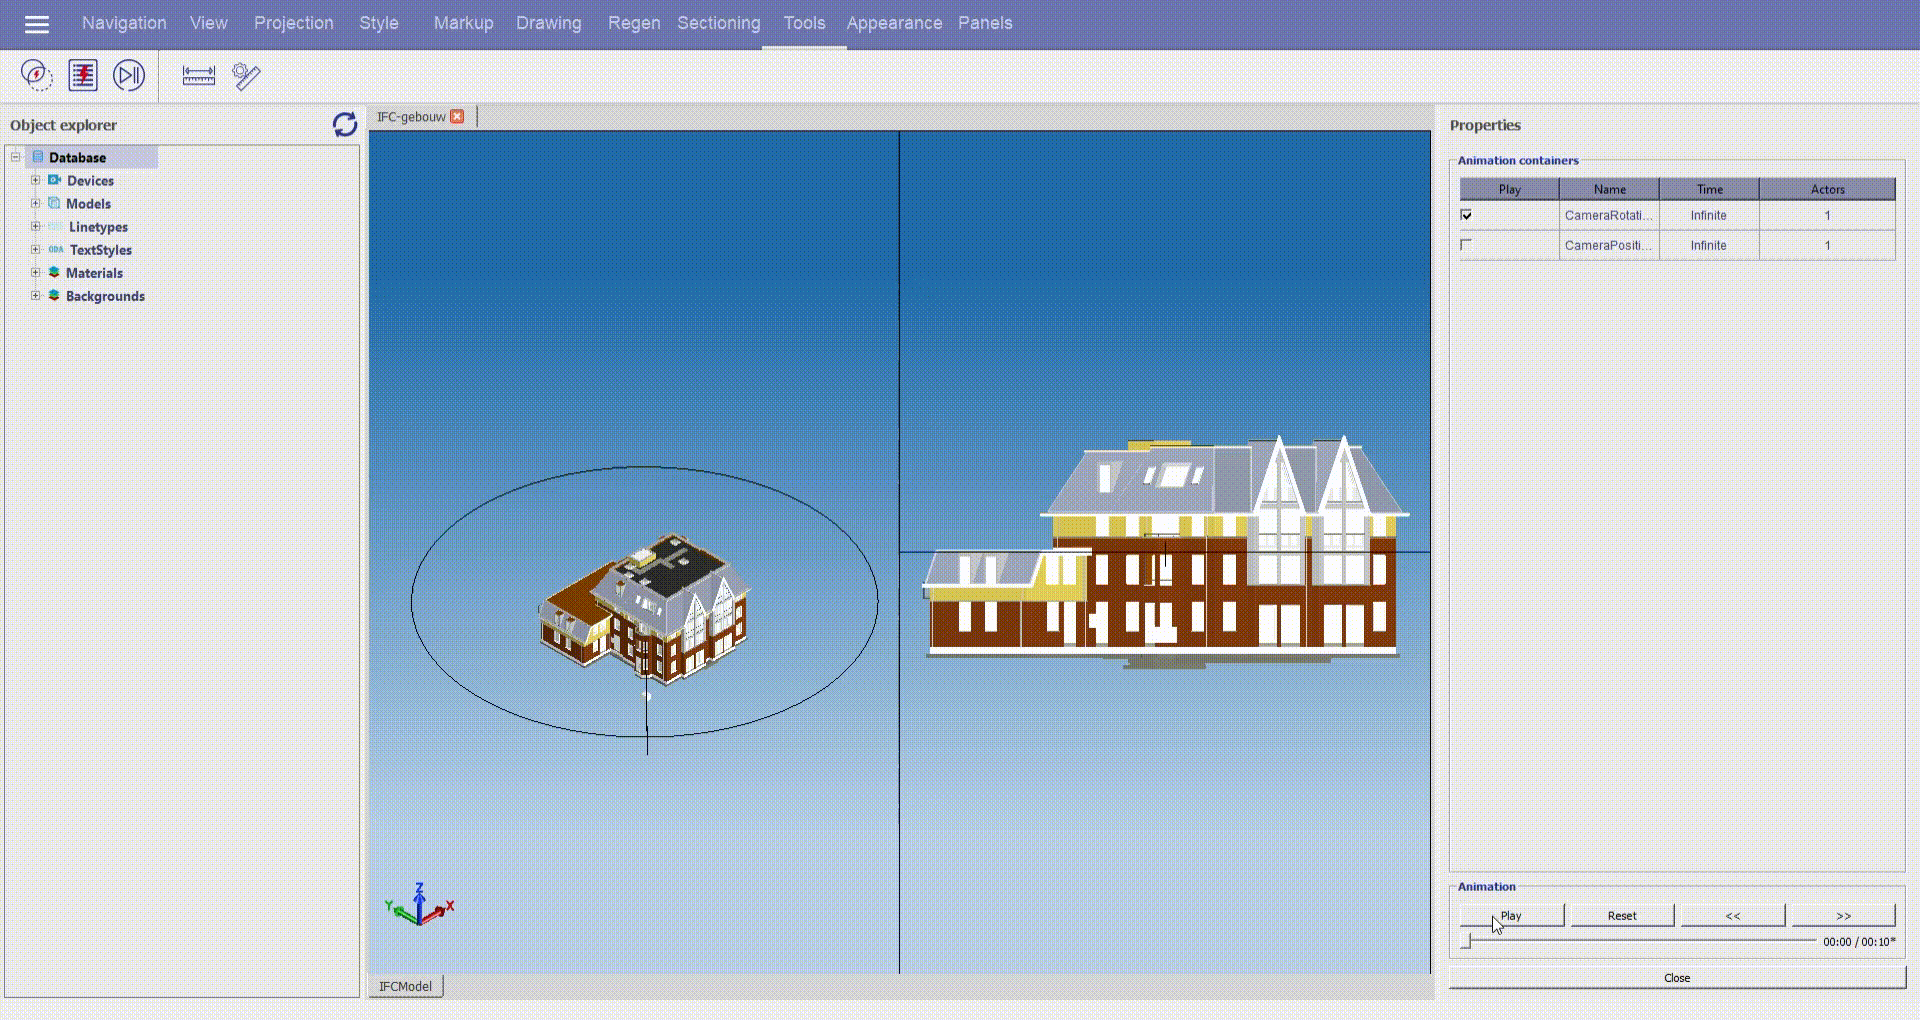
Another animation example can be launched in the OdVisualizeViewer application from Examples > Animation > CameraAnimation. Example of a camera animation:
Source code location for both examples: Visualize/Examples/VisualizeModelsGenerator/VisualizeModelsGeneratorImpl.cpp.
Camera Animation Notes
A camera can be presented as five different actors:
1. A camera may be animated as an entity. In this case, the actor should be the whole camera:
OdTvSubItemPath cameraActor;
cameraActor.entitiesIds().push_back( cameraId );
2. Only the camera position may be animated. In this case, OdTvCamera::positionId() should be used to specify the correct actor:
OdTvSubItemPath cameraPositionActor;
cameraPositionActor.entitiesIds().push_back( cameraId );
cameraPositionActor.geometryDatasIds().push_back( pCamera->positionId() );
3. Only the camera target may be animated. In this case, OdTvCamera::targetId() should be used to specify the correct actor:
OdTvSubItemPath cameraTargetActor;
cameraTargetActor.entitiesIds().push_back( cameraId );
cameraTargetActor.geometryDatasIds().push_back( pCamera->targetId() );
4. Only the camera up vector may be animated. In this case, OdTvCamera::upId() should be used to specify the correct actor:
OdTvSubItemPath cameraUpActor;
cameraUpActor.entitiesIds().push_back( cameraId );
cameraUpActor.geometryDatasIds().push_back( pCamera->upId() );
5. Only the camera field width and height may be animated. In this case, OdTvCamera::fieldsId() should be used to specify the correct actor:
OdTvSubItemPath cameraFieldsActor;
cameraFieldsActor.entitiesIds().push_back( cameraId );
cameraFieldsActor.geometryDatasIds().push_back( pCamera->fieldsId() );
In this case only the kScaleX and kScaleY action frame channels are used to scale the field width and field height of the camera, which is useful for animated zoom operations.
The combination of all five actors allow you to specify completely new camera parameters without common transformation rules for all actors. In this case, it can be useful to disable auto-adjustment of the camera parameters. For example, when auto-adjustment is enabled, specifying a new target may change the camera up vector since the viewing direction and up vector have to be perpendicular. But the up vector animation is applied to the cached value of the up vector. So, disabling auto-adjustment helps to avoid ambiguity.

