This is the first article in a series of articles about using ODA SDKs with Unity. This article shows how to access the database of a .dwg file in a Unity project by creating a Unity project, preparing the ODA environment, reading a .dwg file, and showing information from the file.
Prerequisites used for this article:
- Microsoft® Windows® 10
- Unity 2019.4.22f1
- ODA SDKs 22.3
- Microsoft Visual Studio® 2017
Create and Set Up a Unity Project
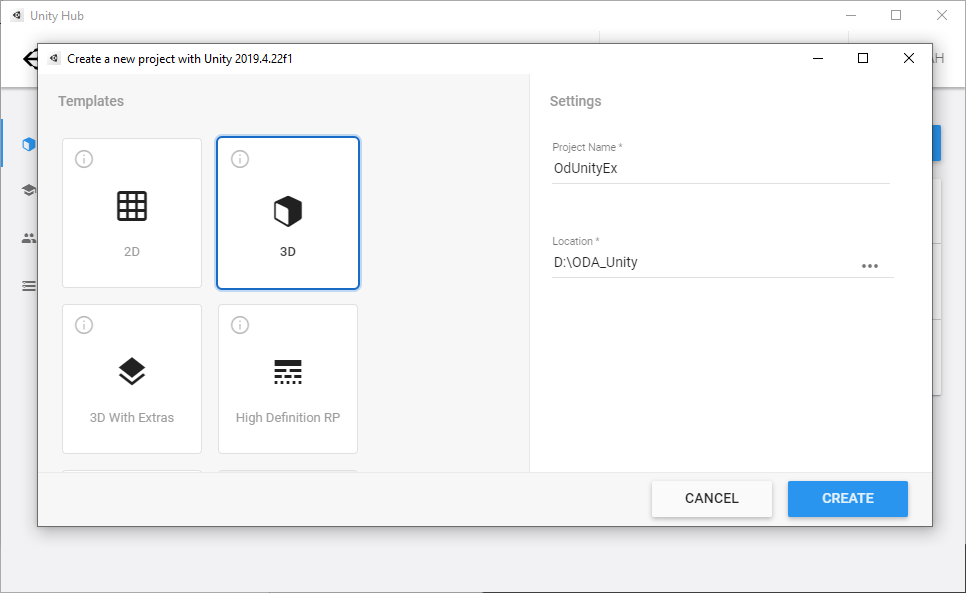
- Create a new Unity project, for example, using D:\ODA_Unity\ as the root folder.
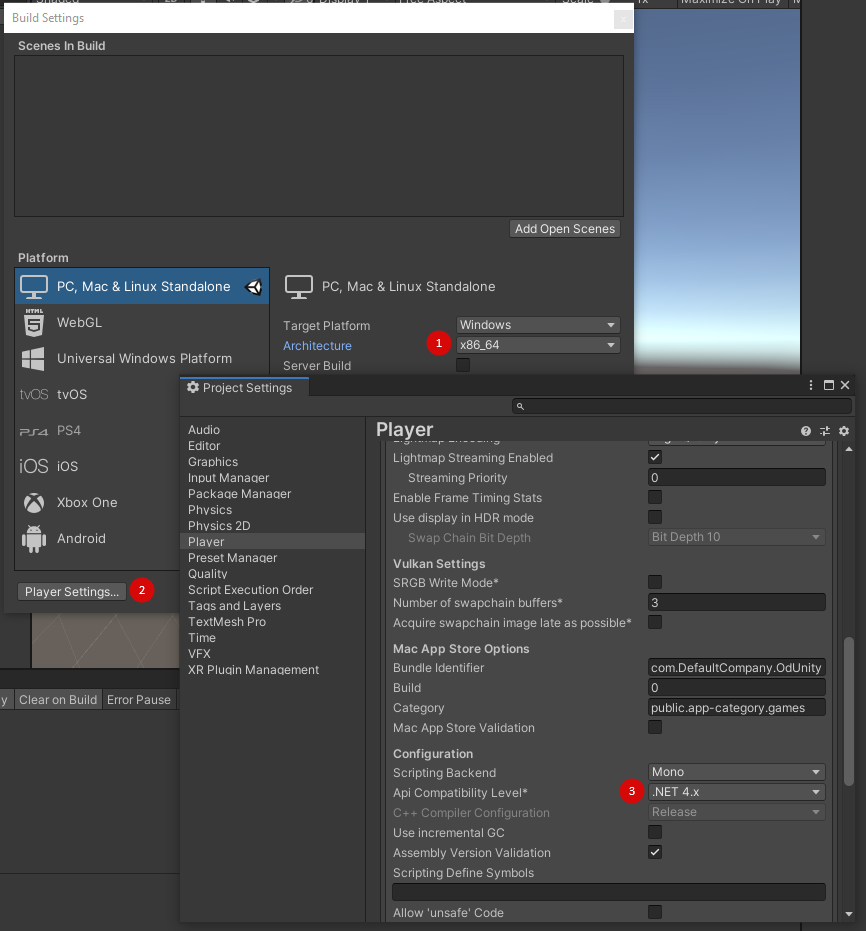
- Choose File > Build Settings and select x86_64 for Architecture. Make sure that Target Platform is set to Windows.
- Click Player Settings, select the Player element in the left panel, and on the Other Settings tab select .NET 4.x API Compatibility Level. Make sure that Scripting Backend is set to Mono.
- Create the following folder structure in the project:
Assets ├ Plugins | └ x86_64 ├ Scenes └ scripts - In the \scripts\ folder, create a C# script named ODAScript.cs.
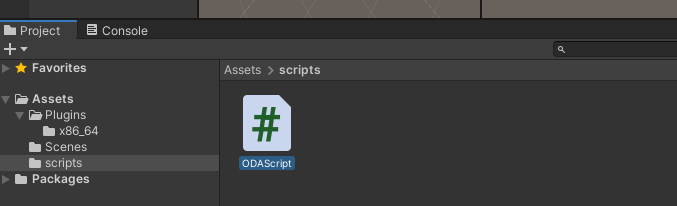
Image 3 – Project structure
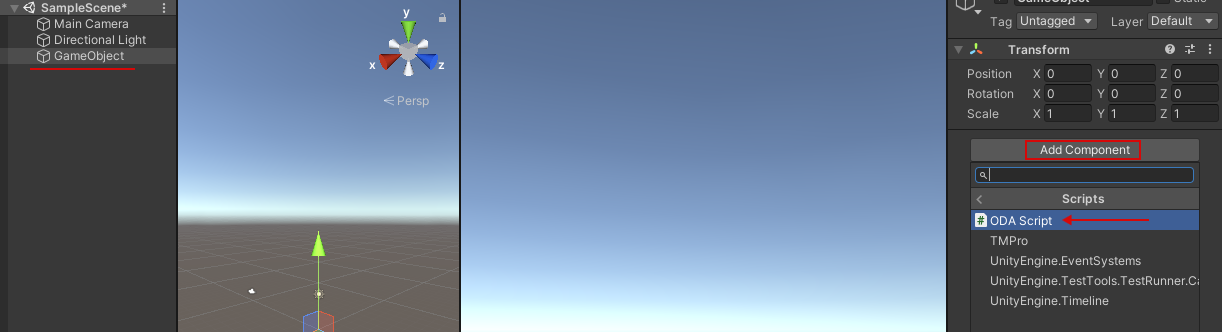
- Create an empty object (GameObject) in a scene (right click the left panel and choose Create Empty). Assign ODAScript.cs to this GameObject.
- Save the scene.
Prepare the ODA Environment
ODA provides cross-platform C++ code for native .dwg support. Also, there are .NET wrappers for the C++ code. To use the .NET wrappers, three packages are needed: Kernel SDK, Drawings SDK, and Drawings.NET SDK. Archives are available in your personal ODA account: https://account.opendesign.com/downloads
Here are the links to the version 22.3 dynamic release build for Visual Studio 2017 (login required):
- https://www.opendesign.com/odoutgoing/PastReleases/2022.3/Kernel/Win64/Kernel_vc15_amd64dll_22.3.zip
- https://www.opendesign.com/odoutgoing/PastReleases/2022.3/Drawings/Win64/Drawings_vc15_amd64dll_22.3.zip
- https://www.opendesign.com/odoutgoing/PastReleases/2022.3/ODA.NET/Drawings.NET_vc15_amd64dll_22.3.zip
- Create a D:\ODA_Unity\ODA_SDK\ folder and merge the three archives into this folder in the following sequence: Kernel SDK, Drawings SDK, Drawings.NET SDK (replace duplicate files if asked).
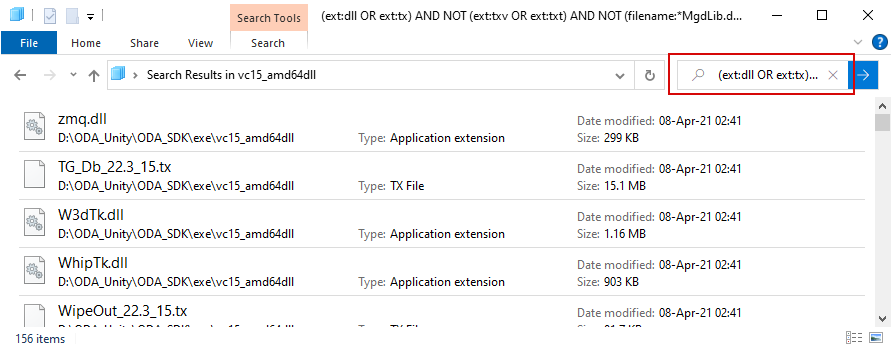
- Search for all DLL and TX files in the D:\ODA_Unity\ODA_SDK\exe\vc15_amd64dll\ folder using the following search pattern in Windows Explorer: (ext:dll OR ext:tx) AND NOT (ext:txv OR ext:txt) AND NOT (filename:*MgdLib.dll OR filename:*ExampleLib.dll)
- Select these files and copy them to D:\ODA_Unity\OdUnityEx\Assets\Plugins\x86_64\. It will take a little time to update Unity.
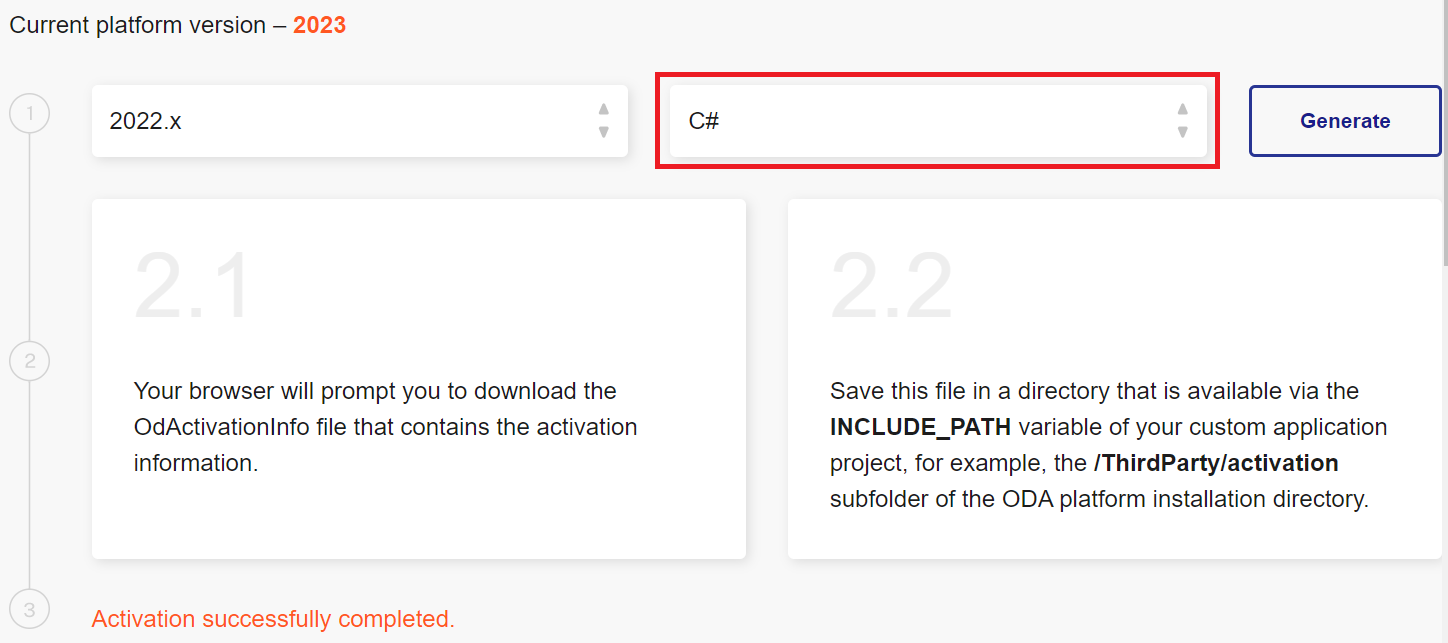
- To build a C# project using ODA libraries, an activation file (OdActivationInfo.cs) must be placed in the Assets\Plugins\x86_64\ folder. This file can be generated via your personal ODA account: https://account.opendesign.com/activation
- Restart Unity.
Read a DWG File
Load a file in the Unity program and print information about an entity to the console.
In this article, a file named “8_Reductor Assembly.dwg” is used, but any .dwg file can be used.
- Place the .dwg file in the D:\ODA_Unity\OdUnityEx\Assets\ folder.
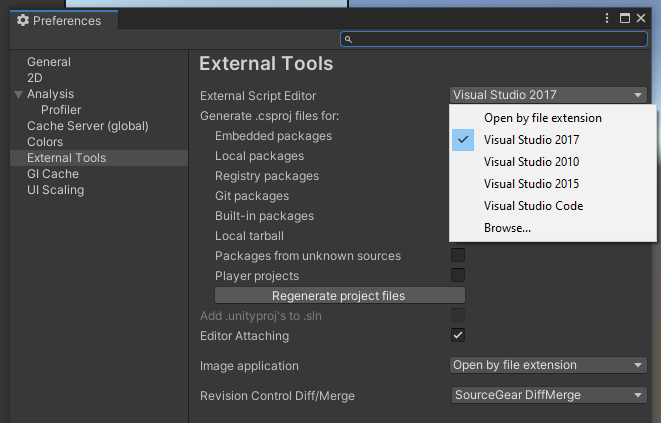
- Select your preferred Visual Studio version in Unity: choose Edit > Preferences, select the External Tools element, and in External Script Editor select the Visual Studio version.
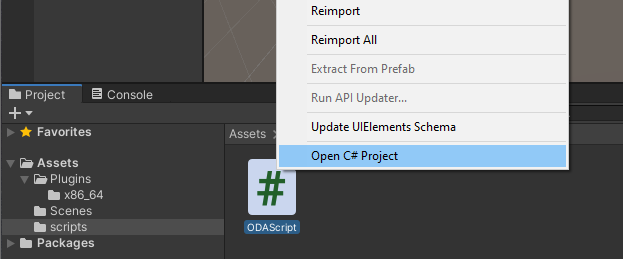
- Select the ODAScript file in the project structure and click Open C# Project (or simply double-click it).
- Add the necessary using statements, add the OdExSystemServices class which activates ODA SDKs, and in the Start() method implement ODA initialization and uninitialization.
using Teigha.Core; using Teigha.TD; class OdExSystemServices : RxSystemServicesImpl { public OdExSystemServices() { // activation information is got from OdActivationInfo.cs Globals.odActivate(ActivationData.userInfo, ActivationData.userSignature); } } public class ODAScript : MonoBehaviour { // Start is called before the first frame update void Start() { // wrap the code by a transaction MemoryManager mMan = MemoryManager.GetMemoryManager(); MemoryTransaction mStartTrans = mMan.StartTransaction(); try { OdExSystemServices systemServices = new OdExSystemServices(); TD_Db.odInitialize(systemServices); // initialize ODA SDK Debug.LogFormat("ODA SDK Initialized"); } catch (OdError e) { Debug.LogFormat("Error: {0}", e.description()); } finally { mMan.StopTransaction(mStartTrans); } // call unitialization methods TD_Db.odUninitialize(); Debug.LogFormat("ODA SDK Unitialized"); Teigha.Core.Helpers.odUninit(); } - Save the file. Do not build the project. Unity does it itself.
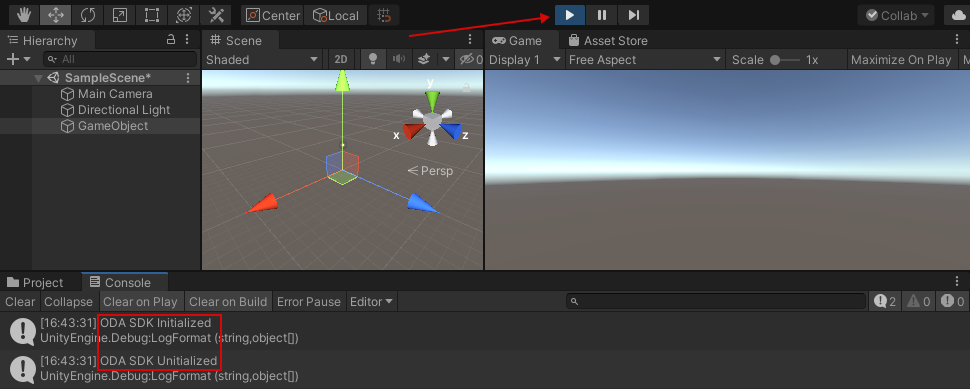
- In Unity, click Play to run the script.
- Open the Console tab. Two debug messages display.
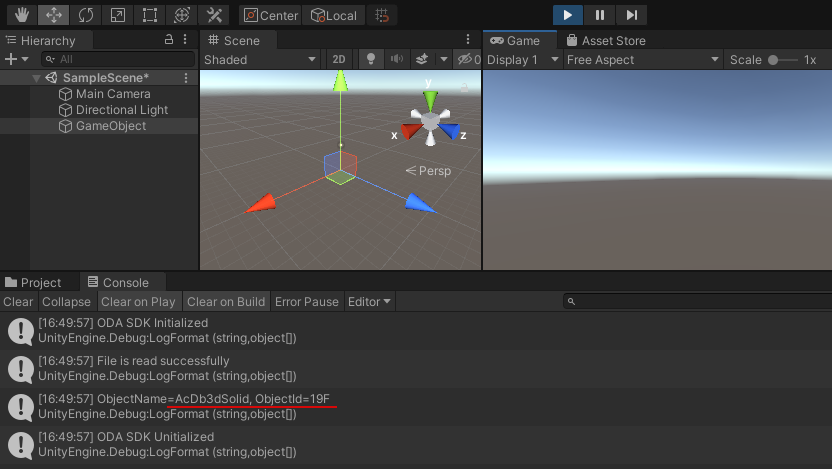
- Add this code after the TD_Db.odInitialize call:
// DWG file reading string sFile = @"Assets\8_Reductor Assembly.dwg"; ExHostAppServices hostApp = new ExHostAppServices(); OdDbDatabase pDb = hostApp.readFile( sFile, true, false, FileShareMode.kShareDenyNo, ""); if (null != pDb) { Debug.LogFormat("File was read successfully"); // open an object by ID OdDb3dSolid solid = pDb.getOdDbObjectId( new OdDbHandle(0x19F)).safeOpenObject() as OdDb3dSolid; Debug.LogFormat("ObjectName={0}, ObjectId={1}", solid.isA().name(), solid.handle().ascii()); } else { Debug.LogFormat("File was not read"); } - Save the code and run the script.
Full Code
using UnityEngine;
using Teigha.Core;
using Teigha.TD;

class OdExSystemServices : RxSystemServicesImpl
{
  public OdExSystemServices()
  {
    Teigha.Core.Globals.odActivate(ActivationData.userInfo,
        ActivationData.userSignature);
  }
}

public class OdUnityEx : MonoBehaviour
{
  // Start is called before the first frame update
  void Start()
  {
    // wrap the code by a transaction
    MemoryManager mMan = MemoryManager.GetMemoryManager();
    MemoryTransaction mStartTrans = mMan.StartTransaction();

    try
    {
      OdExSystemServices systemServices = new OdExSystemServices();
      TD_Db.odInitialize(systemServices); // initialize ODA SDK
      Debug.LogFormat("ODA SDK Initialized");

      // DWG file reading
      string sFile = @"Assets\8_Reductor Assembly.dwg";
      ExHostAppServices hostApp = new ExHostAppServices();
      OdDbDatabase pDb = hostApp.readFile(
          sFile, true, false, FileShareMode.kShareDenyNo, "");

      if (null != pDb)
      {
        Debug.LogFormat("File was read successfully");

        // open an object by ID
        OdDb3dSolid solid = pDb.getOdDbObjectId(
            new OdDbHandle(0x19F)).safeOpenObject() as OdDb3dSolid;

        Debug.LogFormat("ObjectName={0}, ObjectId={1}",
                        solid.isA().name(), solid.handle().ascii());
      }
      else
      {
        Debug.LogFormat("File was not read");
      }

    }
    catch (OdError e)
    {
      Debug.LogFormat("Error: {0}", e.description());
    }
    finally
    {
      mMan.StopTransaction(mStartTrans);
    }

    // call unitialization methods
    TD_Db.odUninitialize();
    Debug.LogFormat("ODA SDK Unitialized");
    Teigha.Core.Helpers.odUninit();
  }
}
In the next article of this series, we will visualize a .dwg file using the Unity engine to import mesh data from OdDbSolid objects and visualize them in Unity.