简介
包含大量元素的复杂图形场景有时绘制缓慢。在这种情况下,动态图形元素(例如光标、夹点/捕捉点、选择矩形、用户界面元素等)也绘制缓慢,因为为了正确组合图形场景和动态图形元素,渲染器必须重新绘制所有底层场景元素。这个问题可以通过使用叠加缓冲区来解决,其中主渲染场景和动态图形元素被绘制到单独的缓冲区。只有包含已更改几何体的缓冲区才会被重新绘制,并最终在屏幕输出期间与未更改的缓冲区组合。
如果矢量化模块支持叠加缓冲区,则图形系统可以调用它们。目前,叠加缓冲区仅由 WinGLES2.txv Teigha 矢量化模块支持。
使用示例
由于命令跟踪器是最常用的动态图形元素之一,因此此使用示例将展示命令跟踪器的简单实现。命令跟踪器是一个简单的自定义可绘制对象,可在 Teigha 命令中使用,以提供额外的视觉信息。首先我们将展示完整的跟踪器列表,然后我们将描述代码中最重要的部分。
命令跟踪器代码列表
class ExRectFrame : public OdEdPointDefTracker, public OdGiDrawableImpl<>
{
  OdGsModelPtr m_pModel; // Overlay model.
  mutable OdGePoint3d m_pts[4];

  virtual OdUInt32 subSetAttributes(OdGiDrawableTraits* ) const ODRX_OVERRIDE
  {
    return kDrawableIsAnEntity;
  }
  virtual bool subWorldDraw(OdGiWorldDraw* pWd) const ODRX_OVERRIDE
  {
    return false;
  }
  virtual void subViewportDraw(OdGiViewportDraw* pVd) const ODRX_OVERRIDE
  {
    const OdGiViewport& vp = pVd->viewport();
    OdGeMatrix3d x = vp.getWorldToEyeTransform();
    OdGePoint3d p0 = x * m_pts[0];
    OdGePoint3d p2 = x * m_pts[2];

    m_pts[1].x = p0.x; m_pts[3].x = p2.x;
    m_pts[1].y = p2.y; m_pts[3].y = p0.y;
    m_pts[1].z = m_pts[3].z = p2.z;

    x = vp.getEyeToWorldTransform();
    m_pts[1].transformBy(x);
    m_pts[3].transformBy(x);

    OdGiDrawFlagsHelper _dfh(pVd->subEntityTraits(), OdGiSubEntityTraits::kDrawNoPlotstyle);
    pVd->subEntityTraits().setFillType(kOdGiFillAlways);
    pVd->subEntityTraits().setTransparency(OdCmTransparency(0.5));
    if (m_pts[3].x < m_pts[1].x)
      pVd->subEntityTraits().setColor(3);
    else
      pVd->subEntityTraits().setColor(5);
    pVd->geometry().polygon(4, m_pts);
  }
  OdGePoint3d basePoint() const
  {
    return m_pts[0];
  }
public:
  static OdEdPointTrackerPtr create(const OdGePoint3d& base)
  {
    OdEdPointTrackerPtr pRes = OdRxObjectImpl<ExRectFrame, OdEdPointTracker>::createObject();
    static_cast<ExRectFrame*>(pRes.get())->m_pts[0] = base;
    return pRes;
  }
  void setValue(const OdGePoint3d& p)
  {
    m_pts[2] = p;
    if (!m_pModel.isNull())
    { // Update drawable cache.
      OdGiDrawable* pParent = NULL;
      m_pModel->onModified(this, pParent);
    }
  }
  int addDrawables(OdGsView* pView)
  {
    m_pModel = pView->device()->createModel();
    if (!m_pModel.isNull()) // Setup model overlay.
      m_pModel->setRenderType(OdGsModel::kDirect);
    pView->add(this, m_pModel);
    return 1;
  }
  void removeDrawables(OdGsView* pView)
  {
    pView->erase(this);
  }
};
为自定义可绘制对象启用叠加缓冲区使用
首先,创建一个单独的图形系统模型对象:
m_pModel = pView->device()->createModel();
需要此单独的模型对象来启用单独的叠加缓冲区:
if (!m_pModel.isNull()) // Setup model overlay.
m_pModel->setRenderType(OdGsModel::kDirect);
主场景通常渲染到“kMain”叠加缓冲区。每种叠加类型都有其自身的特点,可用于不同的需求:
- kUserBg1 - 在主场景下方渲染,不使用深度缓冲区。适用于渲染背景。
- kUserBg2 - 在主场景下方渲染,使用自己的深度缓冲区。适用于在主场景下方渲染精灵和 3D 对象。
- kUserBg3 - 在主场景下方渲染,使用主深度缓冲区。适用于渲染网格。
- kMain - 主图形场景叠加层。
- kSprite - 在主场景上方渲染,使用自己的深度缓冲区。适用于在主场景上方渲染精灵和 3D 对象。
- kDirect - 直接在主场景上方渲染。
- kHighlight - 直接在主场景上方渲染,不使用深度缓冲区。
- kHighlightSelection - 直接在主场景上方渲染,不使用深度缓冲区,但使用高亮样式。
- kDirectTopmost - 在主场景上方渲染,不使用深度缓冲区。
- kContrast - 在主场景上方渲染,不使用深度缓冲区,但使用对比度样式。适用于 UI 元素。
- kUserFg1 - 在主场景上方渲染,使用主深度缓冲区。
- kUserFg2 - 在主场景上方渲染,使用自己的深度缓冲区。
- kUserFg3 - 在所有其他叠加层上方渲染,不使用深度缓冲区。
叠加缓冲区按照表中指定的顺序渲染,因此您可以使用具有相似属性的不同叠加层来选择自定义元素的渲染顺序。如果叠加层不调用深度缓冲区,则叠加层内部的元素渲染顺序是紧急的,因为几何体的 Z 坐标将不被考虑。调用主深度缓冲区的叠加层将像绘制到同一叠加层一样组合(合并期间将考虑场景深度信息)。具有自己深度缓冲区的叠加层可用于渲染 3D 对象,这些对象将在视觉上绘制在主图形场景的上方或下方。下表以更方便的方式显示了特定的叠加层属性:
|
叠加层类型 |
渲染顺序 |
深度缓冲区 |
直接渲染 |
高亮样式 |
对比度样式 |
|
kUserBg1 |
1 |
- |
- |
- |
- |
|
kUserBg2 |
2 |
自有 |
- |
- |
- |
|
kUserBg3 |
3 |
主 |
- |
- |
- |
|
kMain |
4 |
主 |
- |
- |
- |
|
kSprite |
5 |
自有 |
- |
- |
- |
|
kDirect |
6 |
- |
+ |
- |
- |
|
kHighlight |
7 |
- |
+ |
- |
- |
|
kHighlightSelection |
8 |
- |
+ |
+ |
- |
|
kDirectTopmost |
9 |
- |
- |
- |
- |
|
kContrast |
10 |
- |
- |
- |
+ |
|
kUserFg1 |
11 |
主 |
- |
- |
- |
|
kUserFg2 |
12 |
自有 |
- |
- |
- |
|
kUserFg3 |
13 |
- |
- |
- |
- |
标有“直接渲染”功能的叠加缓冲区,如果支持此模式,可以直接由渲染器绘制到屏幕上(跳过中间缓冲区缓存)。
图形系统模型创建和配置后,可渲染对象(可绘制对象)可以与配置的模型一起添加到图形系统视图中:
pView->add(this, m_pModel);
请记住,如果此可绘制对象与图形系统模型指针一起添加到视图中,则将为此可绘制对象创建图形缓存。如果可绘制对象状态被修改并且必须重新绘制,请手动通知图形系统必须为此可绘制对象更新图形缓存:
if (!m_pModel.isNull())
{ // Update drawable cache.
  OdGiDrawable* pParent = NULL;
  m_pModel->onModified(this, pParent);
}
检查自定义跟踪器渲染
要检查自定义跟踪器渲染,请使用任何支持鼠标输入和用户命令上下文的图形示例:
bool OdExEditorObject::OnMouseLeftButtonClick(int x, int y)
{
  OdGePoint3d pt = toEyeToWorld(x, y);
  OdDbUserIO* pIO = m_pCmdCtx->dbUserIO();
  try
  {
    OdEdPointTrackerPtr pTracker = ExRectFrame::create(pt);
    OdGePoint3d pts[2] = {
      pt,
      pIO->getPoint(OD_T("Specify opposite corner:"), OdEd::kGptNoLimCheck|OdEd::kGptNoUCS, NULL, OdString::kEmpty, pTracker)
    };
  }
  catch( const OdError& )
  {
    return false;
  }
  catch( ... )
  {
    throw;
  }
  return true;
}
以下示例只是调用数据库命令上下文以获取输入矩形。如果第二个输入点位于第一个输入点的左侧,则跟踪器绘制一个透明的绿色矩形,否则绘制一个透明的蓝色矩形。
要检查渲染速度,请使用包含大量元素的密集绘图。以下图片是使用包含一百万条彩色线条的文件生成的。首先尝试在没有图形系统模型或图形系统模型配置为主场景叠加缓冲区的情况下调用跟踪器:
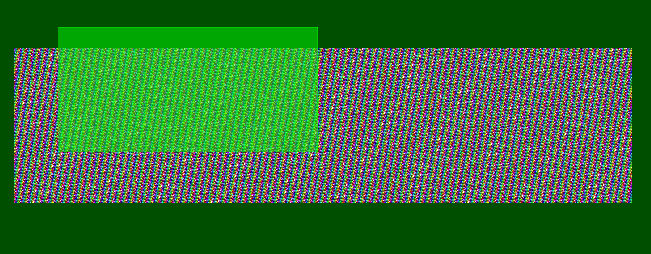
矩形重绘速度在视觉上很慢,因此处理大型文件很困难。启用单独叠加层的使用:
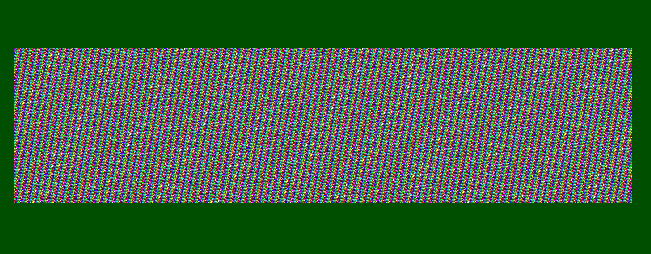
如果启用了叠加缓冲区并受矢量化模块支持,则矩形重绘时间会变得很快。建议编辑器应用程序将大部分动态可变图形元素移动到叠加缓冲区,以提高编辑大型绘图时的应用程序可用性。
叠加层与不兼容矢量化模块的行为
即使矢量化模块不支持叠加缓冲区,使用具有不同渲染类型的独立图形系统模型也会影响渲染结果。首先,图形系统按叠加顺序对可绘制对象进行排序。这意味着叠加模型可用于修改渲染顺序。例如,夹点和其他必须在主场景上方渲染的元素可以放置在渲染类型大于 kMain 渲染类型的模型中。辅助矢量化模块可以禁用需要深度缓冲区的叠加层使用。这意味着放置在具有例如 kDirect 渲染类型的模型中的可绘制对象将绘制在主场景图形的上方,即使这些可绘制对象在空间上位于主场景图形的下方。
结论
在配置渲染元素顺序之前,应用程序可以创建具有相似参数的独立 OdGsView 对象,例如为底层 OdGsView 指定的参数,并在复制的 OdGsView 的顶部或底部绘制它们。这种机制运行良好,但需要比叠加层更多的源代码。但叠加缓冲区的主要优点是能够快速渲染主图形场景顶部或底部动态变化的几何图形。
此功能不仅适用于命令跟踪器、光标、用户界面元素和夹点/捕捉点,还适用于快速高亮显示(或悬停)以及动画场景元素。WinGLES2.txv 矢量化模块调用 GPU OpenGL 帧缓冲区以完全支持叠加缓冲区功能,因此任何显卡(即使是非常旧的显卡)都支持它。总的来说,叠加缓冲区功能将有助于具有创意用户界面的现代编辑应用程序。

