栅格图像包装器提供了一种修改栅格图像数据而不修改原始栅格图像的方法。每个栅格图像包装器都存储一个指向原始图像的智能指针,可以从原始图像获取任何数据并返回,无论是否经过修改。实际上,通过使用栅格图像包装器,我们可以构建一个用于多通道图像处理的传送带。
使用栅格图像包装器简化栅格图像创建
我们可以使用栅格图像包装器来简化本系列第二部分“从头开始创建栅格图像”中描述的 GeneratedRasterImage 类。由于我们使用输入图像中的一些数据,我们可以简单地让我们的 GeneratedRasterImage 类继承自 OdGiRasterImageWrapper 类而不是 OdGiRasterImage,并将我们从文件加载的输入栅格图像设置为此栅格图像包装器的原始图像:
class GeneratedRasterImage : public OdGiRasterImageWrapper
{
    protected:
    OdUInt32 m_pixW, m_pixH;
    ODCOLORREF m_cornerColors[4];
    void computePixel(OdUInt32 x, OdUInt32 y, OdUInt8 *pOutput) const
    {
        // Interpolate colors by X-axis
        const double interpolateX = double(x) / (m_pixW - 1);
        const ODCOLORREF bottom = ODRGB((1.0 - interpolateX) * ODGETRED(m_cornerColors[0])   + interpolateX * ODGETRED(m_cornerColors[1]),
        (1.0 - interpolateX) * ODGETGREEN(m_cornerColors[0]) + interpolateX * ODGETGREEN(m_cornerColors[1]),
        (1.0 - interpolateX) * ODGETBLUE(m_cornerColors[0])  + interpolateX * ODGETBLUE(m_cornerColors[1]));
        const ODCOLORREF top = ODRGB((1.0 - interpolateX) * ODGETRED(m_cornerColors[2])   + interpolateX * ODGETRED(m_cornerColors[3]),
        (1.0 - interpolateX) * ODGETGREEN(m_cornerColors[2]) + interpolateX * ODGETGREEN(m_cornerColors[3]),
        (1.0 - interpolateX) * ODGETBLUE(m_cornerColors[2])  + interpolateX * ODGETBLUE(m_cornerColors[3]));
        // Interpolate colors in Y-axis
        const double interpolateY = double(y) / (m_pixH - 1);
        const ODCOLORREF color = ODRGB((1.0 - interpolateY) * ODGETRED(bottom)   + interpolateY * ODGETRED(top),
        (1.0 - interpolateY) * ODGETGREEN(bottom) + interpolateY * ODGETGREEN(top),
        (1.0 - interpolateY) * ODGETBLUE(bottom)  + interpolateY * ODGETBLUE(top));
        pOutput[0] = ODGETRED(color); pOutput[1] = ODGETGREEN(color); pOutput[2] = ODGETBLUE(color);
    }
    public:
    virtual OdUInt32 pixelWidth() const { return m_pixW; }
    virtual OdUInt32 pixelHeight() const { return m_pixH; }

    virtual const OdUInt8* scanLines() const { return NULL; }
    virtual void scanLines(OdUInt8* scnLines, OdUInt32 firstScanline, OdUInt32 numLines = 1) const
    {
        OdUInt32 scanLen = scanLineSize();
        for (OdUInt32 i = firstScanline; i < firstScanline + numLines; i++)
        {
            OdUInt8 *pScanLine = scnLines + ((i - firstScanline) * scanLen);
            for (OdUInt32 j = 0; j < m_pixW; j++, pScanLine += 3)
            computePixel(j, i, pScanLine);
        }
    }

    GeneratedRasterImage() : m_pixW(1), m_pixH(1) {}
    void configureImage(OdUInt32 nWidth, OdUInt32 nHeight, const OdGiRasterImage *pOriginal, const ODCOLORREF *pColors)
    {
        setOriginal(pOriginal);
        m_pixW = nWidth; m_pixH = nHeight;
        for (int i = 0; i < 4; i++)
        m_cornerColors[i] = pColors[i];
    }
};
OdSmartPtr<GeneratedRasterImage> pImage = OdRxObjectImpl<GeneratedRasterImage>::createObject();
pImage->configureImage(256, 256, pInputImage, inputColors);
pOutputImage = pImage;
在新版本的代码中,我们不需要实现 OdGiRasterImage 接口中的任何纯虚方法,也不需要添加存根等。默认情况下,OdGiRasterImageWrapper 类实现了所有栅格图像接口方法,以将栅格图像数据从原始栅格图像重定向。在我们的示例中,只覆盖 pixelWidth/pixelHeight 方法以返回生成的栅格图像的尺寸,以及 scanLines 方法以返回生成的图像的像素而不是原始栅格图像的像素。像素格式和其他图像属性将从原始栅格图像返回。
创建图像处理包装器
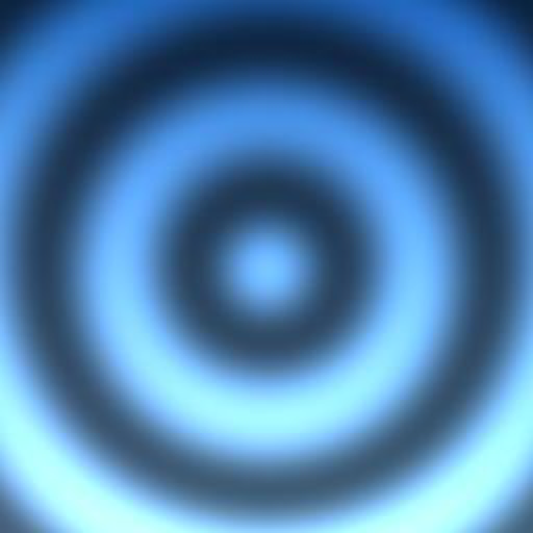
我们可以使用栅格图像包装器来创建任何类型的图像修改器、效果等,只需最少地实现 OdGiRasterImage 接口功能。为了展示这种 Teigha 功能,下面是一个图像修改器,它改变原始栅格图像的像素颜色强度,以创建水面圆圈的视觉效果:
class RasterImageWrapperEx : public OdGiRasterImageWrapper
{
    protected:
    void increaseIntensity(OdUInt8 &color, double intensity) const
    {
        intensity = intensity * color;
        if (intensity > 255.0) intensity = 255.0;
        if (intensity < 0.0) intensity = 0.0;
        color = (OdUInt8)intensity;
    }
    void processPixel(OdUInt32 x, OdUInt32 y, OdUInt8 *pOutput) const
    {
        const OdGeVector2d imageCenter(original()->pixelWidth() / 2, original()->pixelHeight() / 2);
        const double maxLength = imageCenter.length();
        const double lengthFromCenter = (OdGeVector2d(x, y) - imageCenter).length();
        // Define noise level parameters
        const double frequency = 50.0 / OdaPI;
        const double intensity = 0.5;
        // Compute noise level
        const double noiseLevel = (cos((lengthFromCenter / maxLength) * frequency) + 1.0) * intensity + intensity;
        // Apply noise level to pixel color
        increaseIntensity(pOutput[0], noiseLevel);
        increaseIntensity(pOutput[1], noiseLevel);
        increaseIntensity(pOutput[2], noiseLevel);
    }
    public:
    virtual const OdUInt8* scanLines() const { return NULL; }
    virtual void scanLines(OdUInt8* scnLines, OdUInt32 firstScanline, OdUInt32 numLines = 1) const
    {
        OdUInt32 scanLen = scanLineSize();
        for (OdUInt32 i = firstScanline; i < firstScanline + numLines; i++)
        {
            OdUInt8 *pScanLine = scnLines + ((i - firstScanline) * scanLen);
            original()->scanLines(pScanLine, i);
            for (OdUInt32 j = 0; j < original()->pixelWidth(); j++, pScanLine += 3)
                processPixel(j, i, pScanLine);
        }
    }
    RasterImageWrapperEx() {}
};
此栅格图像包装器简单地实现了 scanLines 方法以从原始图像获取像素,并为每个图像像素调用 processPixel 方法以对其颜色应用余弦噪声。此实现没有任何成员,所有余弦噪声参数都已硬编码以简化示例。
现在我们可以创建一个新的栅格图像修改器实例,将我们生成的栅格图像设置为原始图像,并保留栅格图像修改器智能指针以进行进一步处理:
OdSmartPtr<RasterImageWrapperEx> pImage = OdRxObjectImpl<RasterImageWrapperEx>::createObject();
pImage->setOriginal(pOutputImage);
pOutputImage = pImage;
最后,我们可以使用本系列第一部分中“将栅格图像保存到文件”的代码来存储我们生成的栅格图像,并查看生成的文件:

预定义的栅格图像包装器
GiRasterWrappers.h 头文件包含一组预定义的栅格图像包装器,可以在任何基于 Teigha 的项目中随时使用。
最简单的预定义栅格图像包装器之一是上下颠倒的栅格图像转换器。它可以通过一行代码附加到图像处理传送带上:
pOutputImage = OdGiUpsideDownRasterTransformer::createObject(pOutputImage);
它只是以相反的顺序返回图像扫描线;结果我们可以看到图像从上到下镜像:
类似地,我们可以使用左右图像转换器(OdGiLeftToRightRasterTransformer 类)以相反的顺序镜像图像扫描线的像素。
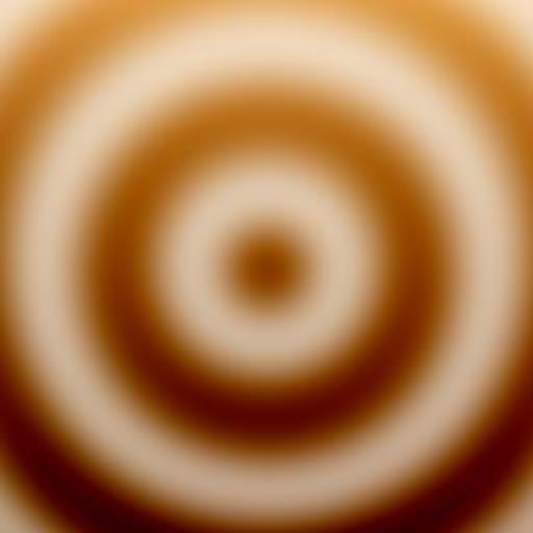
OdGiInversionRasterTransformer 可用于反转原始栅格图像中的像素颜色:
pOutputImage = OdGiInversionRasterTransformer::createObject(pOutputImage);
如果原始栅格图像包含一个内部颜色反转的调色板,那么在其他地方它将具有反转的图像像素颜色:
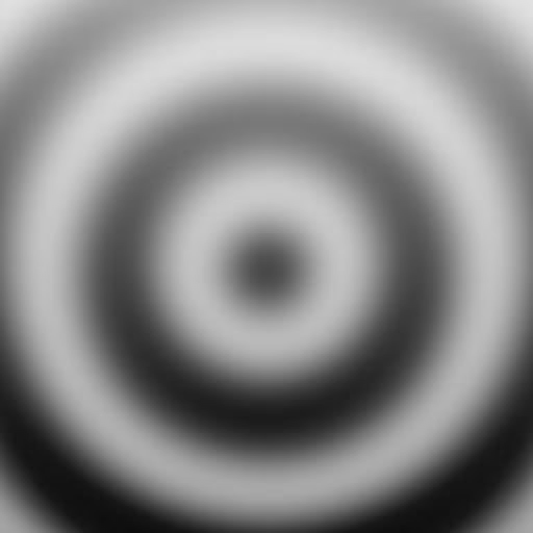
OdGiGrayscaleRasterTransformer 将栅格图像中的颜色转换为灰度:
pOutputImage = OdGiGrayscaleRasterTransformer::createObject(pOutputImage);
使用此包装器后的最终图像将只包含灰色调:
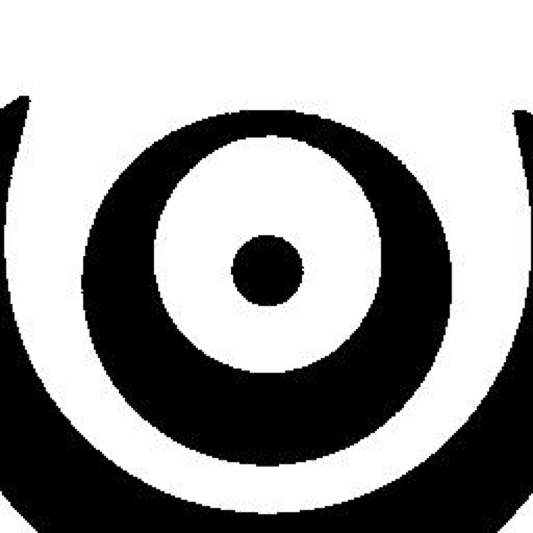
OdGiMonochromaticRasterTransformer 可用于将栅格图像颜色转换为单色(仅限黑白颜色):
pOutputImage = OdGiMonochromaticRasterTransformer::createObject(pOutputImage, 127);
此栅格图像修改器包含一个附加参数“threshold”(阈值),可用于设置深色和浅色之间的像素颜色强度限制。使用默认(范围中间)阈值生成的最终图像:
结论
通过遵循这些示例,我们使用了五个图像修改器来生成最终的单色栅格图像。在最终文件保存期间,栅格服务通过为最后一个栅格图像包装器调用 scanLines 方法,启动了栅格图像包装器之间的一系列 scanLines 方法调用。首先,GeneratedRasterImage 类返回初始渐变像素;然后 RasterImageWrapperEx 将水波纹效果添加到渐变图像上;接下来 scanLines 方法调用一系列镜像图像扫描线、反转图像颜色、将图像颜色转换为灰色调,最后应用单色效果。此图像处理链中的内存使用量极小,因为栅格图像包装器不存储像素副本。在应用图像修改器时,初始栅格图像的任何参数都不会改变。最终的栅格图像仍然被任何 API 视为 OdGiRasterImage 接口,因此我们可以像使用从文件读取的原始栅格图像一样,在任何需要的地方使用修改后的栅格图像。

