レンダリング
OdGiFill特性属性が提供されている場合、対応するシェルをレンダリングする際に塗りつぶしパターンのレンダリングが実行されます。以前の記事で説明したように、既存のOdBmFace->OdBmGFilling->PatternIdが存在する場合、OdGiFillはOdBmFillPatternElem::subSetAttributes(OdGiDrawableTraits* pDrwTraits)呼び出しによって提供されます。OdGiFillは、塗りつぶしパターンをレンダリングするために必要なハッチングデータを表しますが、それだけでは不十分です。パターンを正しくレンダリングするには、OdGiFaceDataとOdGiMapperItemEntryも必要です。
概略的に、このプロセスは以下のステップに分解できます。
1) パターンスケールを決定します。
double patternScal = 1.0;
if (pHatch->isDraft())
{
  if (m_pDrawCtx)
  {
    patternScal = m_pDrawCtx->annotationScale();
  }
}
ドラフトパターンはビューのスケールに依存します。したがって、対応するポータブル拡張機能(Portable Extension)を介して取得し、考慮に入れる必要があります。
2) マッパーを使用すべきかどうかを決定します。
OdGiMapperItemEntryPtr pCurrentMapper;
if (pMapper)
{
  OdGiMapper::Projection proj = pMapper->mapper().projection();
  if (proj == OdGiMapper::kCylinder || proj == OdGiMapper::kSphere)
  {
    pCurrentMapper = pMapper;
  }
}
面が非平面テクスチャマッピングを必要とする場合、塗りつぶしパターンはマッパーによってテクスチャと同じ方法で処理されるべきです。
3) 投影平面を計算し、すべての面の頂点をその平面に投影します。
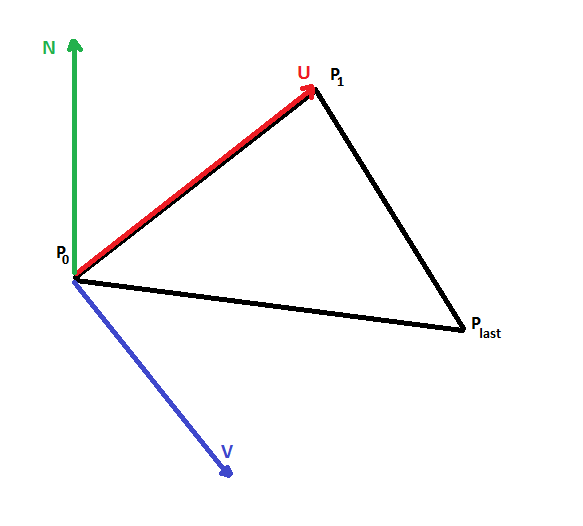
投影平面は点P0、2つの直交ベクトルU,Vで表され、与えられた面の3点(P0, P1, Pn-1)から計算されます。ハッチング処理は2D空間で行われるため、平面の投影が必要です。
4) 必要に応じて、テクスチャマッピング変換を計算します。
OdGePoint3d origin;
OdGeVector3d U, V;
plane.get(origin, U, V);

OdGiMapperItemEntry::MapInputTriangle pts;
pts.inPt[0] = origin;
pts.inPt[1] = origin + U;
pts.inPt[2] = origin + V;

OdGiMapperItemEntry::MapOutputCoords res;
pCurrentMapper->mapCoords(pts, res);

OdGeVector2d newU = res.outCoords[1] - res.outCoords[0];
OdGeVector2d newV = res.outCoords[2] - res.outCoords[0];

OdGeMatrix2d trf;
trf[0][0] = new.x;
trf[0][1] = new.y;
trf[1][0] = new.x;
trf[1][1] = new.y;
マッパーが提示された場合、パターンを面に正しくマッピングするために2Dマッピング変換を使用する必要があります。
5) 面固有のオフセットと角度でハッチデータを修正します。
OdGePoint2d faceFillOrigin = pFaceData->fillOrigins()[faceIndex];
OdGeVector2d faceFillDirection = pFaceData->fillDirections()[faceIndex];

patLine.m_basePoint += faceFillOrigin.asVector();
patLine.m_dLineAngle += faceFillDirection.angle();
面固有のオフセットと角度はOdGiFaceDataを通じて提供され、パターンを正しく描画するために考慮に入れる必要があります。
6) 準備されたデータをハッチ描画プロシージャに送信します。
このプロシージャは2D空間でハッチ線を出力するため、それらを3D空間に変換し直してから描画する必要があります。
bool dash(const OdGePoint2d& _start, const OdGePoint2d& _end)
{
  OdGePoint2d start = m_Trf * _start;
  OdGePoint2d end = m_Trf * _end;

  OdGePoint3d points[2];

  points[0] = m_PlaneOrigin + start.x * m_PlaneU + start.y * m_PlaneV;
  points[1] = m_PlaneOrigin + end.x * m_PlaneU + end.y * m_PlaneV;

  m_pSimplifier->polylineProc(2, points);
  return true;
}