[返回博客](/cn/blog) # 自定义选择样式和高亮显示
Andrew Markovich 四月 08, 2021 [\#getting started](/cn/blog/tag/getting-started) [\#Highlighting](/cn/blog/tag/highlighting)
随着图形应用程序的多样性,单一的默认选择样式可能不适用于所有应用程序类型。例如,机械编辑应用程序的选择要求可能与电气编辑应用程序不同。使用 Visualize,您可以使用默认模式(经典)样式或自定义选择样式以满足个人应用程序需求。例如,您可以使选择更明显或不那么明显,更改着色方案,启用首选高亮显示细节,在场景几何体之上渲染高亮显示等。
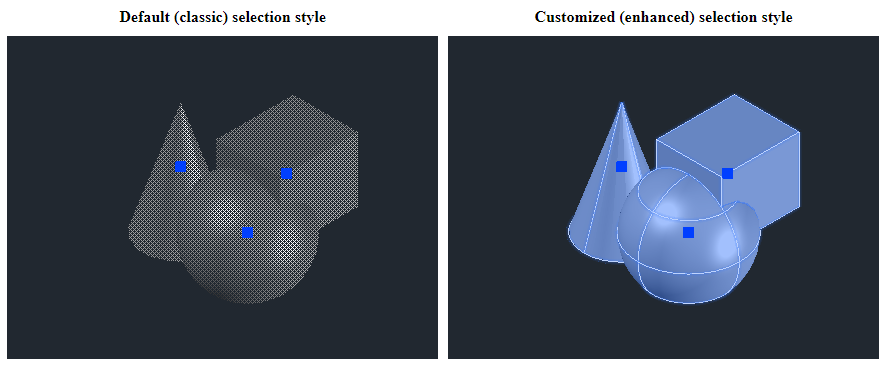
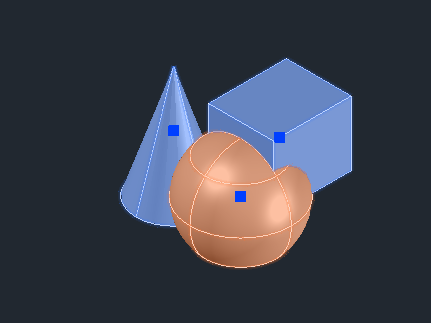
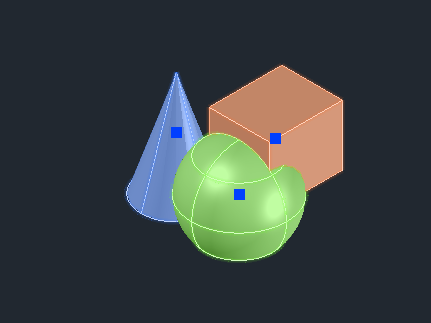
此外,您可以同时为图形场景中的不同对象应用不同的选择样式。多种选择样式对于支持多个高亮显示级别非常有用,例如,选择一组对象并在下图中高亮显示对象的可编辑部分。
选择样式属性拥有超过50,000种设置组合,用于自定义高亮效果。高亮自定义功能适用于所有类型的ODA数据库,并且不依赖于输入文件格式。此功能仅由Open GLES2和Metal矢量化模块支持。
#### 高亮自定义方法
默认情况下,对于.dwg数据库,您可以使用SELECTIONEFFECT系统变量在经典(图案)和增强(颜色蒙版)选择样式之间切换。SELECTIONEFFECTCOLOR系统变量可用于更改增强选择样式的颜色。
要完全控制应用程序的选择样式,请重写OdGiContext::selectionStyle方法(对于任何类型的数据库,都可以以类似方式完成):
```
OdUInt32 CDwgViewer::selectionStyle(OdUInt32 nStyle, OdGiSelectionStyle &selStyle) const
{
if (nStyle > 2)
OdGiDefaultContext::selectionStyle(0, selStyle);
else if (nStyle > 0) // 250 115 48 | 115 250 48
{ OdCmEntityColor entColor((nStyle == 1) ? 250 : 115, (nStyle == 1) ? 115 : 250, 48);
selStyle.setForColorMasking();
for (OdUInt16 nBranch = 0; nBranch < 4; nBranch++)
{
OdGiSelectionStyle::StyleEntry &styleBranch = selStyle.styleFor(GETBIT(nBranch, 1), GETBIT(nBranch, 2));
if (styleBranch.edgeStyle().isColorMaskingEnabled())
styleBranch.edgeStyle().colorMask().setColor(entColor);
if (styleBranch.faceStyle().isColorMaskingEnabled())
styleBranch.faceStyle().colorMask().setColor(entColor);
}
}
else
OdGiContextForDbDatabase::selectionStyle(0, selStyle);
return 4;
}
```
在此示例中,OdGiContextForDbDatabase::selectionStyle方法被重写用于.dwg数据库上下文,并使用四种不同的选择样式:
- 选择样式0 — 选择样式由OdGiContextForDbDatabase选择(增强或经典,取决于SELECTIONEFFECT系统变量设置)。
- 选择样式1 — 颜色蒙版选择样式类似于增强选择样式,但颜色为红色。
- 选择样式2 — 颜色蒙版选择样式类似于增强选择样式,但颜色为绿色。
- 选择样式3 — 经典选择样式,由OdGiDefaultContext::selectionStyle实现提供。
#### 选择样式结构
选择样式结构如下图所示:
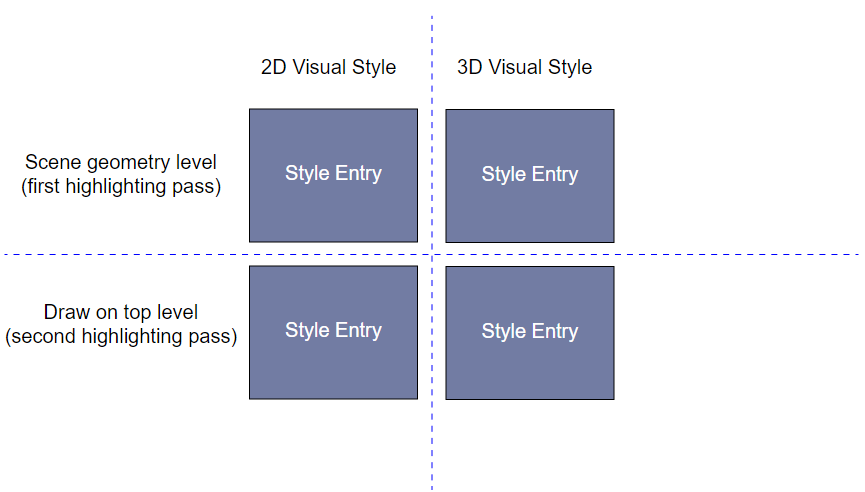在内部,高亮样式由四个样式条目表示。您可以为二维和三维视觉样式指定不同的样式。高亮可以分两遍完成:第一遍高亮与场景图形渲染一起完成,第二遍渲染器在其他图形场景对象之上绘制高亮效果。
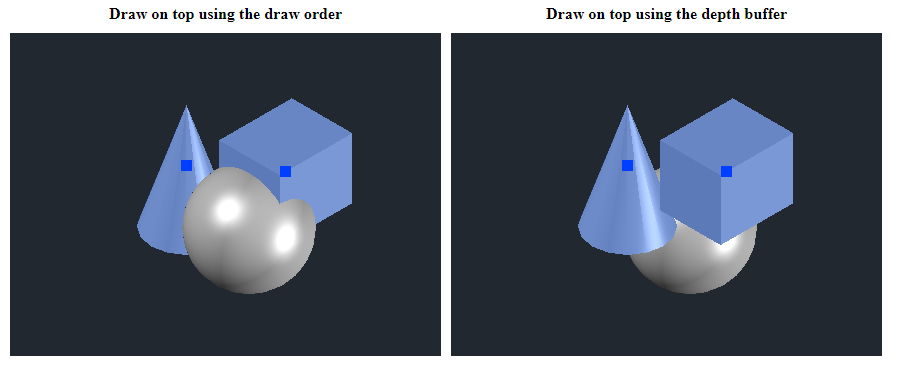
在场景几何体之上绘制高亮效果可以通过两种模式完成:
- 使用绘制顺序在顶部绘制,这适用于二维视觉样式
- 使用深度缓冲区在场景对象顶部绘制,这更适合三维视觉样式
要启用在深度缓冲区顶部显示高亮,请使用OdGiSelectionStyle::setOnTopOfDepth方法。
样式条目结构:
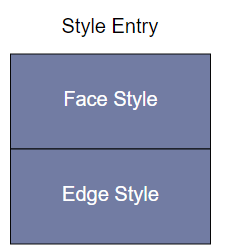每个样式条目都由单独的面样式和边样式配置表示。
#### 面样式
您可以控制面样式的以下属性:
- 几何体可见性 &mdash 要启用或禁用几何体可见性,请使用OdGiSelectionStyle::ElementStyle::setVisible方法。
- 图案效果 &mdash 要启用或禁用高亮图案,请使用OdGiSelectionStyle::ElementStyle::enablePattern方法。
- 颜色蒙版 &mdash 要启用或禁用颜色蒙版效果,请使用OdGiSelectionStyle::ElementStyle::enableColorMasking方法。颜色蒙版的颜色和透明度级别可以通过OdGiSelectionStyle::ColorMask类方法更改。当前样式的OdGiSelectionStyle::ColorMask类由OdGiSelectionStyle::ElementStyle::colorMask方法返回。
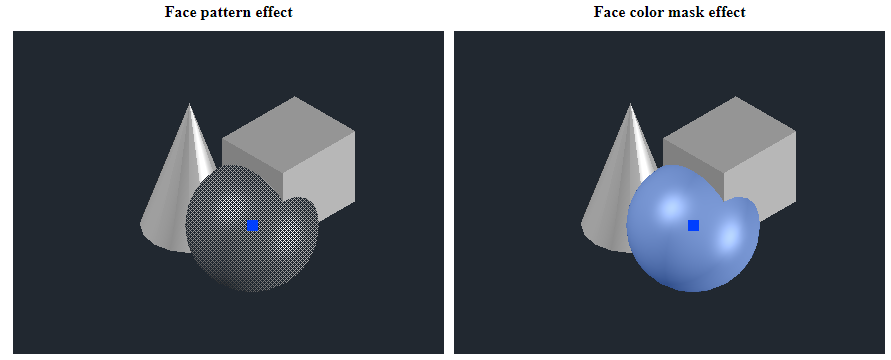图案和颜色蒙版效果可以同时启用。
#### 边样式
您可以控制边样式的以下属性:
- 几何可见性 &mdash 要启用或禁用几何可见性,请使用 OdGiSelectionStyle::ElementStyle::setVisible 方法。
- 图案效果 &mdash 要启用或禁用高亮图案,请使用 OdGiSelectionStyle::ElementStyle::enablePattern 方法。
- 颜色遮罩 &mdash 要启用或禁用颜色遮罩效果,请使用 OdGiSelectionStyle::ElementStyle::enableColorMasking 方法。颜色遮罩的颜色和透明度级别可以通过 OdGiSelectionStyle::ColorMask 类方法更改。当前样式的 OdGiSelectionStyle::ColorMask 类由 OdGiSelectionStyle::ElementStyle::colorMask 方法返回。
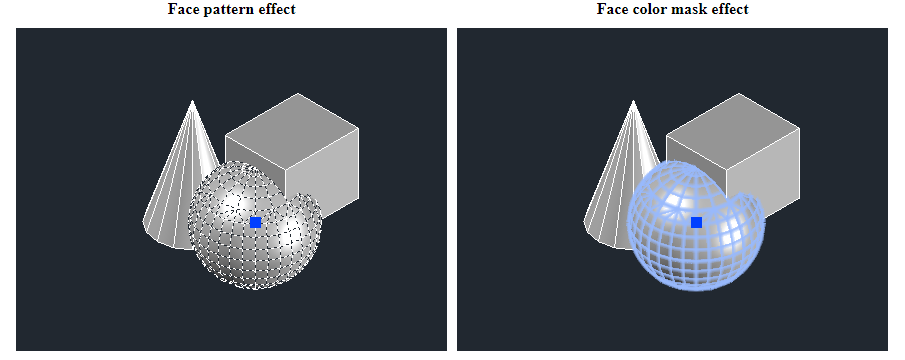图案和颜色遮罩效果可以同时启用。
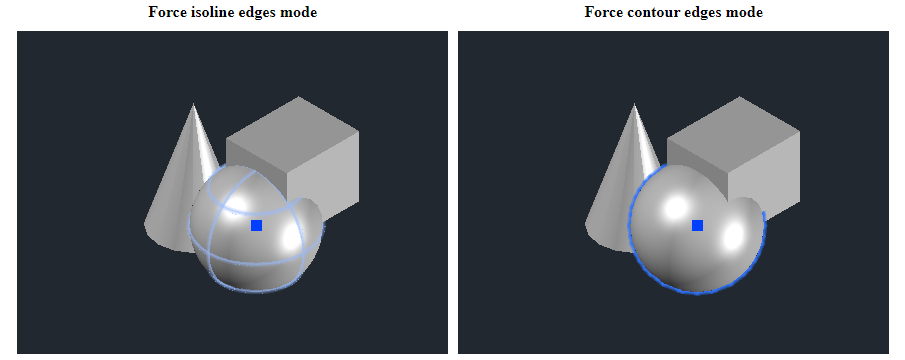
- 边模式 &mdash 有三种边模式:绘制现有边、强制等参线渲染和强制轮廓渲染。这些模式可以使用 OdGiSelectionStyle::EdgeStyle::setMode 方法更改。
- 线宽扩展 &mdash 此属性以像素为单位指定,可以使用 OdGiSelectionStyle::EdgeStyle::setLineWeightExtension 方法设置。默认情况下,渲染器会对扩展线的宽度应用抗锯齿效果,这会在边缘角处创建平滑的渐变(此效果也称为“发光”效果)。平滑级别可以通过 AntiAliasHltLevelExt 属性控制(有关更多信息,请参阅 ODA 矢量化设备属性)。将其设置为 0.0 会禁用抗锯齿效果。
#### 使用多种选择样式的示例
您可以使用 OdGsBaseModelReactor 为任何类型的数据库使用多种选择样式。以下示例展示了如何为 .dwg 数据库使用多种选择样式。
首先,实现一个继承自 OdGsBaseModelReactor 的新类,并重写 OdGsBaseModelReactor::onHighlight 方法:
```
struct MultipleSelectionStyles : public OdGsBaseModelReactor
{
OdUInt32 m_nSelStyle;
MultipleSelectionStyles() : m_nSelStyle(0) { }
virtual bool onHighlight(OdGsModel * /*pModel*/, const OdGiPathNode & /*path*/, bool /*bDoIt*/, OdUInt32 &nStyle, const OdGsView * /*pView*/)
{ nStyle = m_nSelStyle; return true; }
virtual bool onHighlight(OdGsModel * /*pModel*/, const OdGiPathNode & /*path*/, const OdGsMarker * /*pMarkers*/, OdUInt32 /*nMarkers*/, bool /*bDoIt*/, OdUInt32 &nStyle, const OdGsView * /*pView*/)
{ nStyle = m_nSelStyle; return true; }
} mSelStyles;
```
为简单起见,将反应器与选择样式上下文覆盖(来自本主题的“高亮自定义方法”部分)组合在一个类中:
```
struct Ctx : public OdStaticRxObject, public OdGsBaseModelReactor
{
OdUInt32 m_nSelStyle;
Ctx() : m_nSelStyle(0) { }
virtual OdUInt32 selectionStyle(OdUInt32 nStyle, OdGiSelectionStyle &selStyle) const
{
if (nStyle > 2)
OdGiDefaultContext::selectionStyle(0, selStyle);
else if (nStyle > 0) // 250 115 48 | 115 250 48
{ OdCmEntityColor entColor((nStyle == 1) ? 250 : 115, (nStyle == 1) ? 115 : 250, 48);
selStyle.setForColorMasking();
for (OdUInt16 nBranch = 0; nBranch < 4; nBranch++)
{
OdGiSelectionStyle::StyleEntry &styleBranch = selStyle.styleFor(GETBIT(nBranch, 1), GETBIT(nBranch, 2));
if (styleBranch.edgeStyle().isColorMaskingEnabled())
styleBranch.edgeStyle().colorMask().setColor(entColor);
if (styleBranch.faceStyle().isColorMaskingEnabled())
styleBranch.faceStyle().colorMask().setColor(entColor);
}
}
else
OdGiContextForDbDatabase::selectionStyle(0, selStyle);
return 4;
}
virtual bool onHighlight(OdGsModel * /*pModel*/, const OdGiPathNode & /*path*/, bool /*bDoIt*/, OdUInt32 &nStyle, const OdGsView * /*pView*/)
{ nStyle = m_nSelStyle; return true; }
virtual bool onHighlight(OdGsModel * /*pModel*/, const OdGiPathNode & /*path*/, const OdGsMarker * /*pMarkers*/, OdUInt32 /*nMarkers*/, bool /*bDoIt*/, OdUInt32 &nStyle, const OdGsView * /*pView*/)
{ nStyle = m_nSelStyle; return true; }
} _ctx;
```
将反应器实现连接到数据库图形缓存模型:
```
OdGsLayoutHelper::cast(pGsDevuce)->gsModel()->addModelReactor(&_ctx);
```
接下来,当您需要在图形场景中高亮显示某些内容时,只需更改反应器实现中的选择样式编号:
```
{ _ctx.m_nSelStyle = 2; // Change selection style.
// Select entities inside graphics scene and highlight selected.
OdDbSelectionSetPtr pSSet = OdDbSelectionSet::select(pDb->activeViewportId(), 2, pSelPoints);
OdDbSelectionSetIteratorPtr pIt = pSSet->newIterator();
while (!pIt->done())
{
OdDbEntityPtr pEnt = pIt->objectId().safeOpenObject();
pEnt->highlight(true);
pIt->next();
}
}
```
对于实体的每个高亮操作,都会调用反应器的 OdGsBaseModelReactor::onHighlight 方法重写,并简单地用自定义选择样式值替换默认选择样式。
使用不同选择样式进行高亮显示的结果:
## 今天就开始行动
**免费试用 ODA 软件 60 天。
无风险,无需信用卡。**
[免费试用](https://www.opendesign.com/cn/free-trial)