[返回博客](/cn/blog) # 渐进网格的新自动LOD选择(第1部分,共2部分)
Egor Slupko 十二月 10, 2020 [\#Visualize](/cn/blog/tag/visualize) [\#level of details](/cn/blog/tag/level-details) [\#getting started](/cn/blog/tag/getting-started)
从 ODA SDK 21.4 版本开始,OdGiProgressiveMesh 可以通过调用 OdGiProgressiveMesh::selectLOD() 方法自动选择细节级别 (LOD)。
OdGiProgressiveMesh 支持 OdGiProgressiveMesh::ProgressiveMeshAutoSelectLOD 枚举中描述的 LOD 选择机制,包括自定义(用户定义)选择和插值选择。
#### 插值LOD选择
OdGiProgressiveMesh::kSqrInterpolation 和 OdGiProgressiveMesh::kSqrtInterpolation 提供了两种插值 LOD 选择方法。
这些方法使用 OdGiViewport 重新计算网格范围的像素对角线。然后它们使用两个阈值:minPixels 和 maxPixels。如果重新计算的对角线长度小于 minPixels 值,则使用 LOD 0(最小)。如果重新计算的对角线长度大于 maxPixels 值,则使用 numLODs()(最大)。对于其他情况,这些方法在以下两个点之间插值 LOD:(minPixel, LOD 0) 和 (maxPixel, numLODs)。
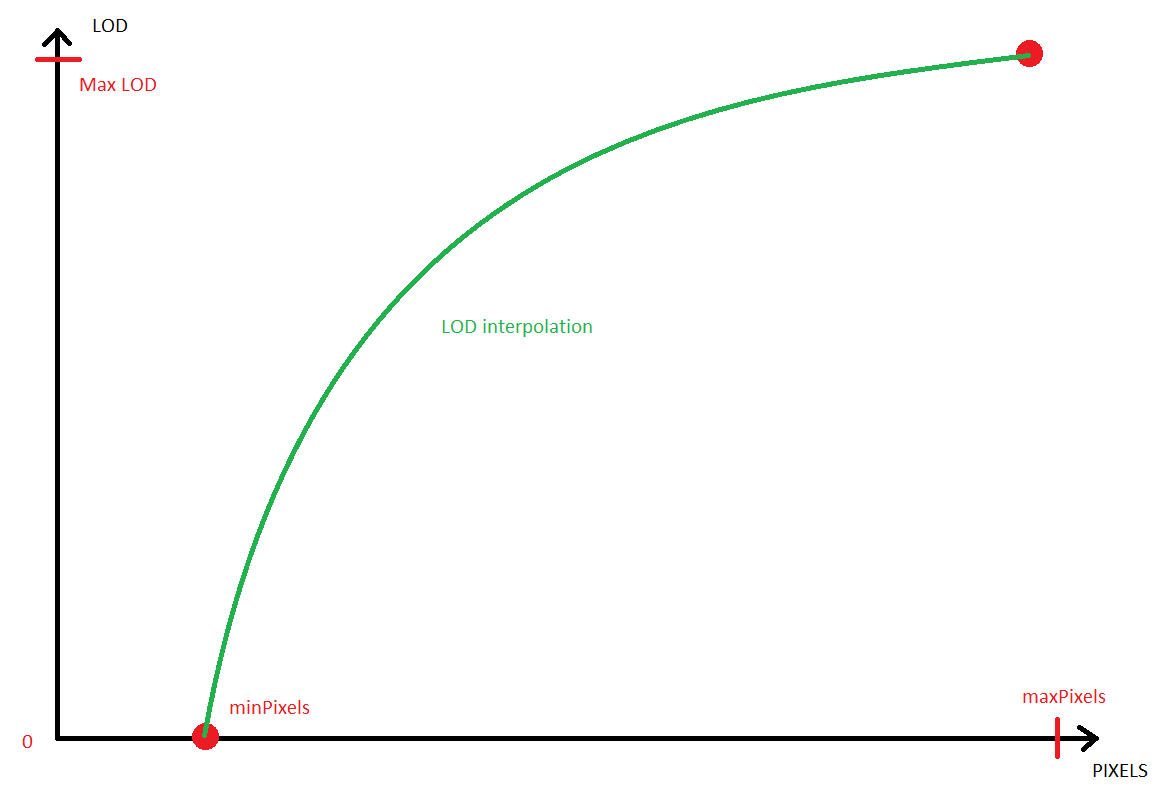OdGiProgressiveMesh::kSqrInterpolation 使用平方插值:LOD = A \* diagonal \* diagonal + B。由于平方函数增长迅速,此方法试图保持网格的较少细节表示并提供更好的性能,但可能会出现一些视觉简化缺陷。
OdGiProgressiveMesh::kSqrtInterpolation 使用平方根插值:LOD = A \* sqrt(diagonal) + B。此方法呈现更详细的网格,因此视觉简化缺陷应该不可见。但是,对于指定的视图,网格可能“过于详细”,因此性能可能会降低。
#### 插值LOD选项
OdGiProgressiveMesh 类有一个新的 setAutoSelectLODOptions() 方法,用于为插值 LOD 选择指定 OdGiProgressiveMeshAutoLODSelectOptions 类的一个实例。此类别定义了 minPixels 和 maxPixels 插值阈值:
```
OdUInt32 maxPixels() const;
OdUInt32 minPixels() const;
```
#### 自定义LOD选择
OdGiProgressiveMesh 类还提供了自定义(用户定义)LOD 选择:OdGiProgressiveMesh::kCustom。在使用此选择之前,应实现 OdGiProgressiveMeshAutoLODSelectCallback 的实例,并使用 OdGiProgressiveMesh::setCustomLODAutoSelectCallback() 方法进行指定。
实现的 callback 方法应返回渐进网格的适当细节级别,作为区间 \[0, numLODs()\] 中的 OdUInt32 值:
```
virtual OdUInt32 selectLOD( const OdGiProgressiveMesh* pPM, const OdGiViewport* pView, const OdGeMatrix3d* pModelToWorldTransform ) const = 0;
```
所有超出此区间的值都将被视为错误,并且细节级别不会切换。
#### 自定义LOD示例
OdGiProgressiveMesh 类不提供细节级别的线性插值。但是,您可以使用自定义细节级别选择来添加它:
```
class OdGiLinearLODInterpolation : public OdGiProgressiveMeshAutoLODSelectCallback
{
public:
OdUInt32 selectLOD( const OdGiProgressiveMesh* pPM, const OdGiViewport* pView, const OdGeMatrix3d* pModelToWorldTransform )
{
//Obtain extents diagonal
double D = pPM->extents().diagonal().length();
//Obtain viewport scales
OdGePoint2d scale;
pView->getNumPixelsInUnitSquare( pView->getCameraLocation(), scale, pView->isPerspective() );
double maxDim = scale.x > scale.y ? scale.x : scale.y;
//Scale diagonal
maxDim *= D;
//Interpolation options
OdUInt32 minPx = pPM->autoSelectLODOptions().minPixels();
OdUInt32 maxPx = pPM->autoSelectLODOptions().maxPixels();
//Check interpolation interval
if( maxDim < minPx ) return 0; //Less that minimum - always minimum LOD
if( maxDim > maxPx ) return pPM->numLODs(); //More than maximum - always maximum LOD
//Interpolation: LOD = A * pixels + B, where 0 = A * minPx + B and numLODs = A * maxPx + B
double A = (double)( pPM->numLODs() ) / (double)( maxPx - minPx );
double B = -1.0 * A * minPx;
return (OdUInt32)( A * maxDim + B );
}
};
…
OdGiLinearLODInterpolation* linearLODInterpolation = new OdGiLinearLODInterpolation();
pPM->setCustomLODAutoSelectCallback( linearLODInterpolation );
pPM->selectLOD( OdGiProgressiveMesh::kCustom, pViewport );
```
本系列的下一篇文章将介绍如何在 Visualize SDK 中使用新的自动 LOD 选择。
## 今天就开始行动
**免费试用 ODA 软件 60 天。
无风险,无需信用卡。**
[免费试用](https://www.opendesign.com/cn/free-trial)