[返回博客](/cn/blog) # 在 .dwg 文件中使用 .dgn 线型(第 2 部分,共 4 部分)
Andrew Markovich 一月 03, 2019 [\#dgn](/cn/blog/tag/dgn) [\#.dwg](/cn/blog/tag/dwg) [\#Example](/cn/blog/tag/example)
本文是关于在 .dwg 文件中使用 DGN 线型系列文章的一部分。有关上一篇文章,请参阅[第 1 部分](https://www.opendesign.com/blog/2018/december/using-dgn-line-styles-dwg-file-part-1-4)。
#### 内部线型组件
DGN 文件格式支持八个内部组件——硬编码的线型,它们无法更改以具有不同的行为:
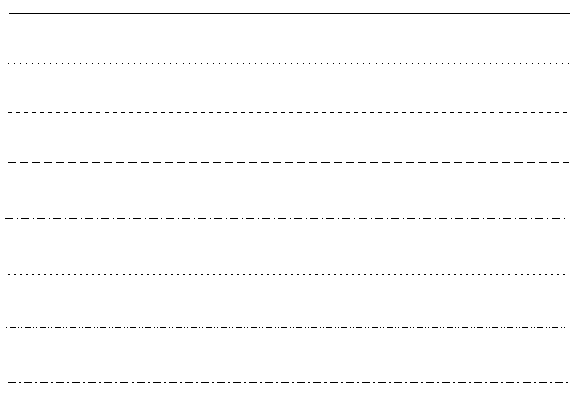与自定义线型相比,内部线型始终以像素为单位测量,并且可以在缩放操作后重新计算。不建议使用 AcDgnLS.tx 模块内部线型组件来创建自定义线型,但这并非不可能。
要使用内部线型组件,请包含以下头文件:
```
#include "DgnLS/DbLSInternalComponent.h"
```
现在我们可以构造一个新的内部线型组件,就像[第一篇文章](https://www.opendesign.com/blog/2018/december/using-dgn-line-styles-dwg-file-part-1-4)中的描边图案组件一样,但带有一些附加参数:
```
// Create Internal LineStyle Component
OdDbLSInternalComponentPtr pComponent = OdDbLSInternalComponent::createObject();
pComponent->setComponentType(kLSInternalComponent);
pComponent->setComponentUID(dgnLS_UID);
pComponent->setHardwareStyle(lineCode); // Required for back Dgn import only.
pComponent->setIsHardwareStyle(false); // True for hardcoded internal Dgn styles.
pComponent->setLineCode(0x80000000 + lineCode);
// Append strokes
pComponent->insertStroke(0.008)->setDash();
pComponent->insertStroke(0.003)->setGap();
pComponent->insertStroke(0.002)->setDash();
pComponent->insertStroke(0.003)->setGap();
```
与描边图案组件一样,我们必须设置图案的描边和间隙。但内部图案组件可以通过硬件渲染,在这种情况下,附加的描边会被忽略,而是绘制硬编码的样式。所有硬编码图案都显示在上一张图片中,它们调用 0-7 范围内的代码。下表描述了这些值:
| 硬件样式 | 线代码(十六进制) | 图案描述 |
| :---: | :---: | :---: |
| 0 | 0x80000000 | 连续。 |
| 1 | 0x80000001 | 点。 |
| 2 | 0x80000002 | 短划线。 |
| 3 | 0x80000003 | 长划线。 |
| 4 | 0x80000004 | 短划线,点。 |
| 5 | 0x80000005 | 短划线。 |
| 6 | 0x80000006 | 点,短划线,点。 |
| 7 | 0x80000007 | 长划线,短划线。 |
为避免内部图案组件由硬件渲染,请将硬件样式设置为“false”:
```
pComponent->setIsHardwareStyle(false);
```
在使用内部组件时,还需要额外调用一次以正确设置与我们的内部线型组件相关的 OdDbLSDefinition 类:
```
pLSDef->setIsContinuous(true); // True for internal components.
```
进行这些更改后,我们得到了与[上一篇文章](https://www.opendesign.com/blog/2018/december/using-dgn-line-styles-dwg-file-part-1-4)中描边图案组件所示的线型相同的图像:
与描边图案组件相比,此线型将在图形重新生成期间重新计算,因此在缩放后,它将具有相似长度的虚线和间隙,这看起来就像线型是在屏幕平面上以像素绘制的。
#### 内部图案组件创建(完整命令源代码
```
#include "DbLinetypeTable.h"
#include "DbLinetypeTableRecord.h"
#include "DbLine.h"
#include "DgnLS/DbLSDefinition.h"
#include "DgnLS/DbLSInternalComponent.h"
#include "DgnLS/DbLSMisc.h"
void _CreateDgnLineStyle_Internal_func(OdEdCommandContext* pCmdCtx)
{
OdDbDatabasePtr pDb = pCmdCtx->baseDatabase();
OdDbUserIOPtr pIO = pCmdCtx->userIO();
::odrxDynamicLinker()->loadModule(OdDgnLSModuleName);
const OdUInt32 lineCode = 7; // We can utilize any code in 1-7 range.
// We need GUID for DgnLS objects
OdUInt8 dgnLS_UID[16];
::oddbDgnLSInitializeImportUID(dgnLS_UID);
// Create Internal LineStyle Component
OdDbLSInternalComponentPtr pComponent = OdDbLSInternalComponent::createObject();
pComponent->setComponentType(kLSInternalComponent);
pComponent->setComponentUID(dgnLS_UID);
pComponent->setHardwareStyle(lineCode); // Required for back Dgn import only.
pComponent->setIsHardwareStyle(false); // True for hardcoded internal Dgn styles.
pComponent->setLineCode(0x80000000 + lineCode);
// Append strokes
pComponent->insertStroke(0.008)->setDash();
pComponent->insertStroke(0.003)->setGap();
pComponent->insertStroke(0.002)->setDash();
pComponent->insertStroke(0.003)->setGap();
// Add component into LineStyles dictionary
OdDbDictionaryPtr pDict = ::oddbDgnLSGetComponentsDictionary(pDb, OdDb::kForWrite, true);
pDict->setAt(OD_T("DemoDgnLineStyleInternalComponent"), pComponent);
// Create LineStyle Definition
OdDbLSDefinitionPtr pLSDef = OdDbLSDefinition::createObject();
pLSDef->setIsContinuous(true); // True for internal components.
pLSDef->setComponent(pComponent->objectId());
pLSDef->setComponentUID(pComponent->componentUID());
// Create Linetype Table Record
OdDbLinetypeTableRecordPtr pLtpRec = OdDbLinetypeTableRecord::createObject();
pLtpRec->setName(OD_T("DemoDgnLineStyleInternal"));
pLtpRec->setComments(OD_T("Internal stroke component"));
OdDbObjectId lsId = OdDbLinetypeTable::cast(pDb->getLinetypeTableId().safeOpenObject(OdDb::kForWrite))->add(pLtpRec);
// Attach LineStyle Definition to Linetype Table Record
pLtpRec->createExtensionDictionary();
OdDbDictionaryPtr pLtpDict = OdDbDictionary::cast(pLtpRec->extensionDictionary().openObject(OdDb::kForWrite));
pLtpDict->setAt(::oddbDgnLSGetDefinitionKeyName(), pLSDef);
// Create line for LineStyle testing
OdDbLinePtr pLine = OdDbLine::createObject();
pLine->setDatabaseDefaults(pDb);
pLine->setLinetype(lsId);
pLine->setEndPoint(OdGePoint3d(1.0, 0.0, 0.0));
OdDbBlockTableRecord::cast(pDb->getActiveLayoutBTRId().safeOpenObject(OdDb::kForWrite))->appendOdDbEntity(pLine);
}
```
本系列的下一篇文章描述了如何使用块(符号)DGN 线型组件。
## 今天就开始行动
**免费试用 ODA 软件 60 天。
无风险,无需信用卡。**
[免费试用](https://www.opendesign.com/cn/free-trial)