[返回博客](/cn/blog) # 基于 GPU 的剖面可视化
Andrew Markovich 十二月 19, 2019 [\#sectioning](/cn/blog/tag/sectioning) [\#clipping](/cn/blog/tag/clipping)
从 ODA SDK 2020 Update 1 版本开始,您可以实时绘制几何剖面。此功能可用于需要调查对象几何结构的不同产品。与在 CPU 端计算的剖面相比,基于 GPU 的剖面不生成任何输出几何或分析剖面信息;它们只能用于剖面结果的视觉表示。
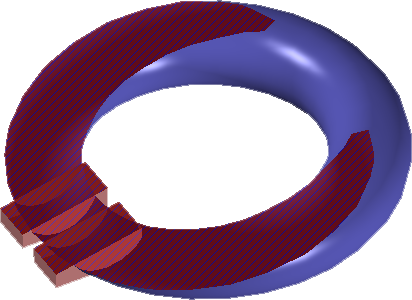
这种剖面处理完全由 GPU 完成。这意味着在剖面渲染期间,CPU 可以执行其他任务。剖面渲染性能仅取决于 GPU 的能力。
基于 GPU 的剖面仅支持 OpenGL ES2 渲染器。目前没有计划支持旧版渲染器,但未来也计划为 Metal 渲染器提供剖面解决方案。
#### OdHardwareSectionsInterface API
由于硬件加速的剖切功能完全取决于渲染设备的具体情况,因此与硬件剖切功能通信的接口只能通过 [Gs 属性 API 直接从矢量化设备获取](https://docs.opendesign.com/tv/frames.html?frmname=topic&frmfile=gs_DeviceProps.html)(需要登录)
要调用 OdHardwareSectionsInterface API 类,请包含以下头文件:
```
#include "ExHardwareSections.h"
```
它位于 .\\main\\Kernel\\Extensions\\ExRender 目录中。
现在我们需要一个指向活动 OdGsDevice 的指针。您可以创建一个新的 OdGsDevice 并准备它进行渲染,或者获取一个现有的 OdGsDevice。这取决于应用程序的具体情况。
注意:OdGsDevice 需要从 WinGLES2.txv 矢量化模块创建。其他矢量化模块不支持硬件剖切,并且后面描述的设备属性对它们不可用。
您可以按照以下代码片段所示访问硬件剖切接口:
```
OdHardwareSectionsInterface *pHwSections = NULL;
if (pGsDevice && !pGsDevice->properties().isNull() && pGsDevice->properties()->has(OD_T("HardwareSections")))
pHwSections = static_cast(pGsDevice->properties()->getAt(OD_T("HardwareSections")).get());
```
现在,如果 (pHwSections != NULL),您可以调用硬件剖切功能。
OdHardwareSectionsInterface API 类提供了添加新剖切平面、变换、移除和访问现有剖切平面以及自定义剖切几何体外观的功能。所有剖切平面对于不同的 OdGsView 都是唯一的,因此每个 OdGsView 都可以包含自己的一组剖切平面。
下一个示例将移除第一个设备视图中现有的剖切平面(如果存在)并添加一个新的剖切平面:
OdHardwareSectionsInterface \*pHwSections = getHwSectionsIface(pGsDevice);
```
if (pHwSections)
{
OdGsView *pView = pGsDevice->viewAt(0);
// Remove existing section planes if present
if (pHwSections->numSectionPlanes(pView))
pHwSections->clearSectionPlanes(pView);
// Add new section plane
pHwSections->addSectionPlane(pView, OdHardwareSectionsInterface::SectionDef(m_position, m_normal));
// Enable section plane filling and set up filling color
pHwSections->setEnableSectionsFill(pView, true);
pHwSections->setSectionsFillColor(pView, ODRGBA(255, 0, 0, 255));
}
```
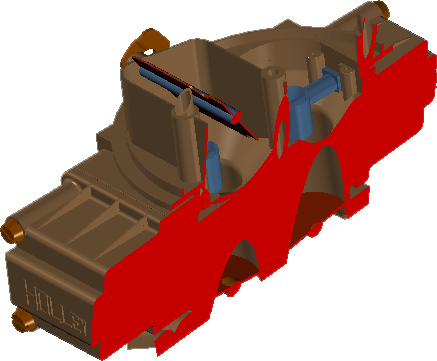
每个剖切平面都由平面位置(作为 OdGePoint3d)和法线(作为 OdGeVector3d)指定。这是一个经典的平面规范。默认情况下,剖切填充是禁用的(通过简单的几何体裁剪完成),因此使用 OdHardwareSectionsInterface::setEnableSectionsFill() 方法启用它。最后一次调用设置了不透明的红色用于剖切填充。如果平面方向指定正确,我们将得到以下剖切图像:
现在尝试使用以下调用自定义剖切行为:
```
pHwSections->setSectionsFillColor(pView, ODRGBA(255, 0, 0, 128));
pHwSections->setEnableSectionsFillPattern(pView, true);
pHwSections->setSectionsFillPattern(pView, OdPs::kFsSlantRight);
pHwSections->setSectionsFillPatternColor(pView, ODRGBA(0, 0, 255, 255));
```
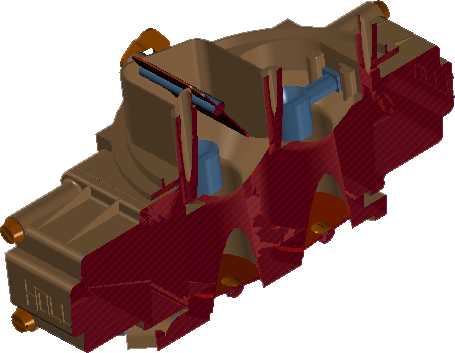
首先,我们为剖切填充设置半透明的红色。接下来的调用用于启用将图案渲染到剖切几何体上,设置图案类型,并将图案颜色设置为蓝色。最终图像:
最后,再添加一个剖切平面以展示多个剖切平面的行为:
```
pHwSections->addSectionPlane(pView, OdHardwareSectionsInterface::SectionDef(m_position, m_normal));
pHwSections->addSectionPlane(pView, OdHardwareSectionsInterface::SectionDef(m_position, m_normal.rotateBy(OdaPI2, OdGeVector3d::kZAxis)));
```
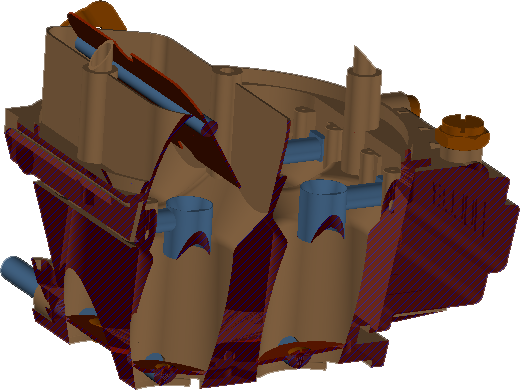
次要剖切平面的法线绕 z 轴旋转 90°。最终图像:
注意:如果剖切填充被禁用,我们将通过剖切平面进行简单的裁剪:
#### 结论
基于 GPU 的剖切具有以下特点:
- 硬件剖切生成是完全基于 GPU 的解决方案,因此性能仅取决于 GPU 的能力。此效果会调用多个渲染通道,因此有剖切和无剖切的渲染性能可能会略有不同。
- 剖切的外观可以自定义。
- 完全支持多个剖切平面。
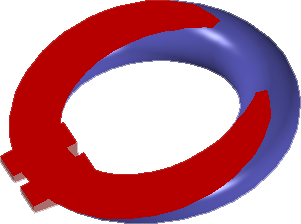
- 适用于自相交和重叠的几何体:
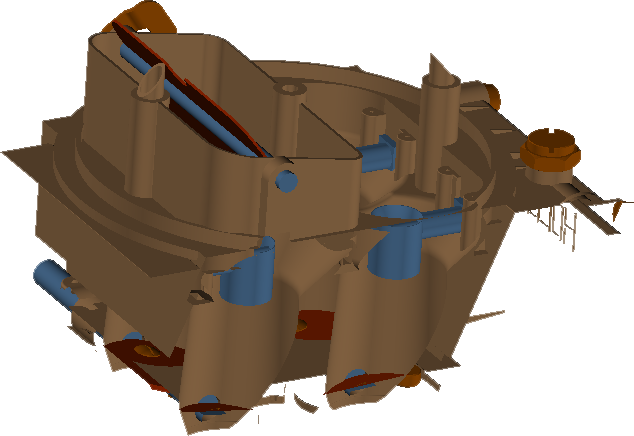
- 剖切算法仅适用于有效的封闭模型(没有未配对的孔),否则剖切渲染可能会产生不可预测的伪影: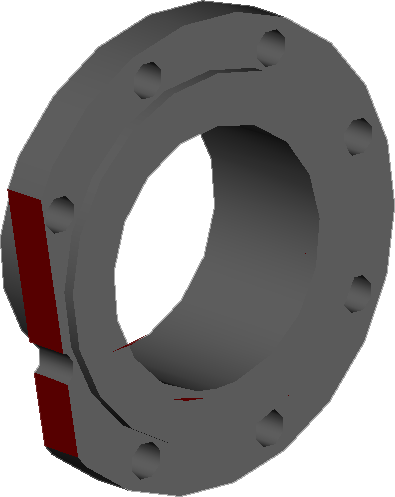
此图片显示模型底部的两个小红色三角形 – 由 3D 模型不正确性产生的伪影。
- 硬件剖切仅适用于最新的图形设备:OpenGL ES2,并将很快支持 Metal。
GPU 剖切可以在常见的现代硬件上有效地处理并取得良好效果。
## 今天就开始行动
**免费试用 ODA 软件 60 天。
无风险,无需信用卡。**
[免费试用](https://www.opendesign.com/cn/free-trial)