[返回博客](/cn/blog) # Teigha BIM:填充图案简介 \[第 2 部分\]
Daniil Zhirnov 七月 18, 2017 [\#rvt](/cn/blog/tag/rvt) [\#rfa](/cn/blog/tag/rfa) [\#Example](/cn/blog/tag/example)
#### 渲染
当提供 OdGiFill 特征属性时,在渲染相应的壳体时执行 FillPattern 渲染。如[上一篇文章](https://www.opendesign.com/blog/2017/july/teigha-bim-introduction-fillpatterns-part-1)所述,如果存在现有的 OdBmFace->OdBmGFilling->PatternId,则 OdBmFillPatternElem::subSetAttributes(OdGiDrawableTraits\* pDrwTraits) 调用会提供 OdGiFill。OdGiFill 表示渲染 FillPattern 所需的填充线数据,但这还不够。要正确渲染图案,还需要 OdGiFaceData 和 OdGiMapperItemEntry。
该过程可以概括为以下步骤:
1\) 确定图案比例。
```
double patternScal = 1.0;
if (pHatch->isDraft())
{
if (m_pDrawCtx)
{
patternScal = m_pDrawCtx->annotationScale();
}
}
```
草图图案是视图比例相关的。因此,应获取(通过相应的可移植扩展)并考虑在内。
2\) 确定是否应使用映射器。
```
OdGiMapperItemEntryPtr pCurrentMapper;
if (pMapper)
{
OdGiMapper::Projection proj = pMapper->mapper().projection();
if (proj == OdGiMapper::kCylinder || proj == OdGiMapper::kSphere)
{
pCurrentMapper = pMapper;
}
}
```
如果面需要非平面纹理映射,则应由映射器以与纹理相同的方式处理 FillPattern。
3\) 计算投影平面并将所有面顶点投影到该平面。
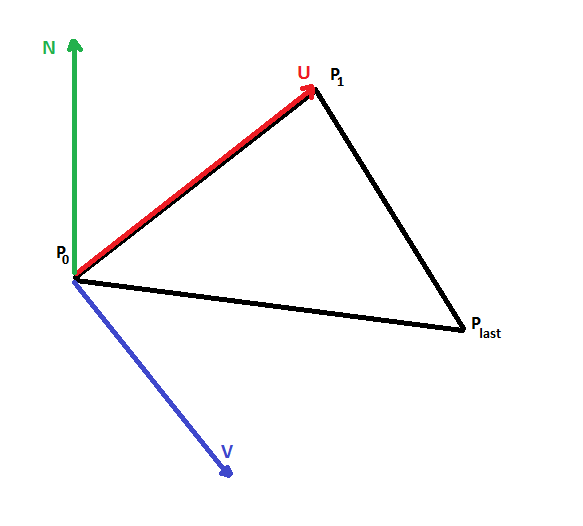投影平面由点 P0、两个正交向量 U、V 表示,并根据给定面的三个点 (P0, P1, Pn-1) 计算得出。需要投影平面,因为填充线处理是在 2D 空间中完成的。
4\) 如果需要,计算纹理映射变换。
```
OdGePoint3d origin;
OdGeVector3d U, V;
plane.get(origin, U, V);
OdGiMapperItemEntry::MapInputTriangle pts;
pts.inPt[0] = origin;
pts.inPt[1] = origin + U;
pts.inPt[2] = origin + V;
OdGiMapperItemEntry::MapOutputCoords res;
pCurrentMapper->mapCoords(pts, res);
OdGeVector2d newU = res.outCoords[1] - res.outCoords[0];
OdGeVector2d newV = res.outCoords[2] - res.outCoords[0];
OdGeMatrix2d trf;
trf[0][0] = new.x;
trf[0][1] = new.y;
trf[1][0] = new.x;
trf[1][1] = new.y;
```
如果存在映射器,则应使用 2D 映射变换将图案正确映射到面上。
5\) 使用面特定的偏移和角度校正填充线数据。
```
OdGePoint2d faceFillOrigin = pFaceData->fillOrigins()[faceIndex];
OdGeVector2d faceFillDirection = pFaceData->fillDirections()[faceIndex];
patLine.m_basePoint += faceFillOrigin.asVector();
patLine.m_dLineAngle += faceFillDirection.angle();
```
通过 OdGiFaceData 提供面特定的偏移和角度,必须考虑这些因素才能正确绘制图案。
6\) 将准备好的数据发送到填充线绘制过程。
该过程在 2D 空间中输出填充线,因此必须将它们转换回 3D 空间,然后进行绘制。
```
bool dash(const OdGePoint2d& _start, const OdGePoint2d& _end)
{
OdGePoint2d start = m_Trf * _start;
OdGePoint2d end = m_Trf * _end;
OdGePoint3d points[2];
points[0] = m_PlaneOrigin + start.x * m_PlaneU + start.y * m_PlaneV;
points[1] = m_PlaneOrigin + end.x * m_PlaneU + end.y * m_PlaneV;
m_pSimplifier->polylineProc(2, points);
return true;
}
```
## 今天就开始行动
**免费试用 ODA 软件 60 天。
无风险,无需信用卡。**
[免费试用](https://www.opendesign.com/cn/free-trial)